Node Client Web UI Deployment
Node Client provides a lightweight web based control plane interface within the Cluster Wizard system.
It can be used to register and administer Node Wizard managed hosts in environments where the full Cluster Wizard control plane is not required. Node Client provides authenticated access for node registration, state management, and centralized control of Node Wizard hosts.
Node Client Web UI provides the same control plane functionality as the Node Client CLI through a graphical, browser based interface. This document describes how to deploy and configure Node Client Web UI for interacting with Node Wizard managed hosts using a Helm chart on Kubernetes. For the command line interface, see Node Client CLI.
Prerequisites
Before you start, ensure the following are available:
- A running Kubernetes cluster. Cluster Admin privileges are recommended, though a namespace admin role may be sufficient.
- A default storage class with a working provisioner.
- If a default storage class is not available, you must manually create and bind PersistentVolumeClaims (PVCs).
- Verify Kubernetes storage class is present
kubectl get storageclasses.storage.k8s.io - A Kubernetes-compatible load balancer (e.g., MetalLB or LoxiLB) if you plan to expose Node Client Web UI using the LoadBalancer service type.
- Network connectivity requirements:
- The Node Client Web UI backend and frontend services must have network access to the Node Wizard managed hosts it controls.
- Users accessing the Web UI must have network access to the exposed Node Client Web UI services.
- An ingress controller (e.g., NGINX or HAProxy) must be installed if you plan to expose Node Client Web UI using Kubernetes Ingress.
- Optional: Cert Manager for automatic certificate management to simplify handling mTLS certificates.
Node Client Web UI Helm Installation (Quick Start)
A matching helm chart version for Node Wizard 0.4.x versions is 0.2.0.
helm repo add cluster-wizard https://charts.cluster-wizard.com/
helm search repo cluster-wizard/node-client-webui --versions
helm fetch cluster-wizard/node-client-webui --version 0.2.0 --untar
helm -n node-client install node-client ./node-client-webui \
    --create-namespace --values ./node-client-webui-values-override.yaml
Assuming that
- Website address is node-client.example.com
- A tls key and certificate are provided in Kubernetes secret named tls-secret
- Login credentials are admin / admin123
- Load Balancer is used for exposing website externally, and the load balancer ip is 192.168.132.242.
The URL needs to be a valid DNS entry and must resolve to the IP address returned by the loadBalancer.
An example node-client-webui-values-override.yaml file is shown below:
---
configMap:
  backendUrl: "node-client.example.com:23051"
  frontendUrl: "node-client.example.com"

expose:
  internalTLS:
    enabled: true
    secretName: "tls-secret"
  type: loadBalancer
  loadBalancer:
    IP: "192.168.132.242"
    ports:
      frontPort: 443
      backPort: 23051

secret:
  username: "admin"
  password: "admin123"
The certificate needs to be trusted by client system/browsers.
Various Expose Methods
There are a few more methods for exposing services: ingress, proxy server (with clusterIP service) and nodePort. The following figure shows the expose methods with their value sections.
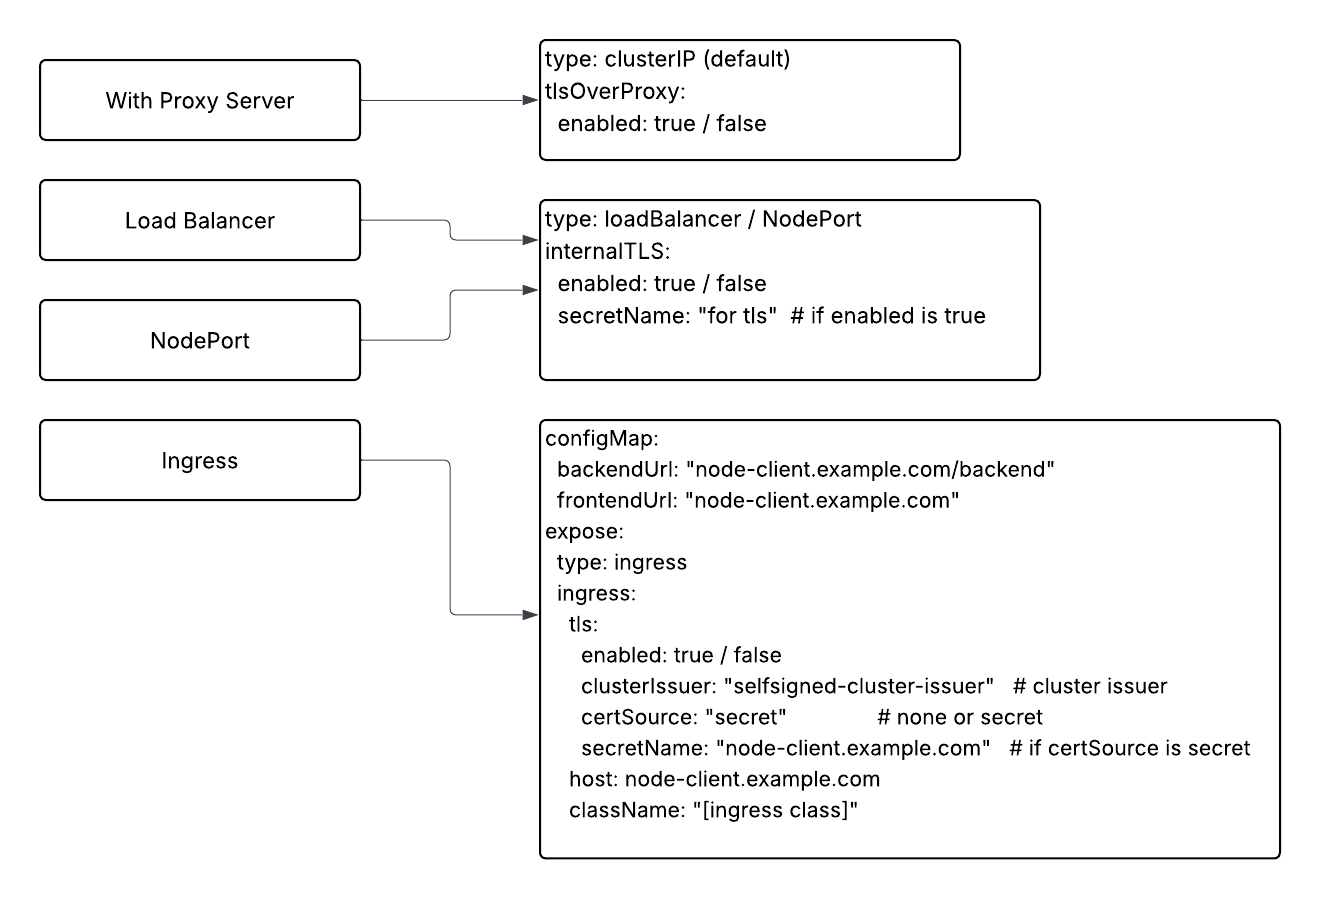
Ingress
Kubernetes Ingress is an API object that manages external access to services within a cluster, typically HTTP and HTTPS traffic.
In the helm chart, rewrite rules were added so that the backend server URL is in the form [frontend server URL]/backend. These annotations are for NGINX and HAProxy ingress classes. If a different ingress class is used, appropriate annotations must be added.
The following example node-client-webui-values-override.yaml file is for the case where
- haproxy ingress class is used
- A cert manager's cluster issuer (named selfsigned-cluster-issuer) is used for automatic certificate generation
- The complete frontend server URL is https://node-client.example.com
configMap:
  backendUrl: "node-client.example.com/backend"
  frontendUrl: "node-client.example.com"

expose:
  type: ingress
  ingress:
    tls:
      enabled: true
      clusterIssuer: "selfsigned-cluster-issuer"
      certSource: "secret"
      secretName: "node-client.example.com"
    host: node-client.example.com
    className: "haproxy"
For an HTTP-only service, remove the tls section from the ingress configuration.
Over Proxy Server
A proxy server is an intermediary server that sits between clients and other servers. It acts as a gateway, receiving requests from clients and forwarding them to destination servers, then returning the responses back to the clients.
In Kubernetes clusters, an application proxy server (such as Nginx Proxy server and HAProxy) is often used. We can use a proxy server to expose node-client-webui servers.
Depending on how a proxy server is configured, the values are similar either to that of ingress or to that of load balancer. If the proxy server provides TLS communication, tlsOverProxy.enabled should be true. The FrontendURL and BackendURL should be set accordingly.
The following example node-client-webui-values-override.yaml shows how to specify values when:
- TLS communication is provided by a proxy server
- The same rewrite rule is implemented in the proxy server
---
configMap:
  backendUrl: "node-client.example.com/backend"
  frontendUrl: "node-client.example.com"

expose:
  tlsOverProxy:
    enabled: true
This will create a Kubernetes service object of clusterIP type. A proxy server forwards requests to the frontend/backend server to this service.
Node Port
NodePort is a type of Kubernetes Service that exposes an application running in a cluster by allocating a specific port on every node in the cluster. It's one of the primary ways to make services accessible from outside the Kubernetes cluster.
NodePort value is similar to that of load balancer. A simple node-client-webui-values-override.yaml example is shown below.
---
configMap:
  backendUrl: "node-client.example.com:30003"
  frontendUrl: "node-client.example.com:30002"

expose:
  internalTLS:
    enabled: true
    secretName: "tls-secret"
  type: nodePort
To add a host, a token for node-wizard is necessary. This token will be printed when node-wizard is installed. To retrieve this token, run the following command.
sudo /root/bin/node_wizard/node-wizard --token
To attach a PCI device, its PCI address needs to be added to allowed (PCI address) list.
# Add a PCI address to the allowed list
sudo /root/bin/node_wizard/node-wizard --add-allowed [PCI address]
# To print the list
sudo /root/bin/node_wizard/node-wizard --list-allowed
To prevent a bridge to be attached, the network device/bridge needs to be added to disallowed list
# Add a PCI address to the allowed list
sudo /root/bin/node_wizard/node-wizard --add-disallowed [network device/bridge]
# To print the list
sudo /root/bin/node_wizard/node-wizard --list-disallowed
Troubleshooting
Quick Diagnostic Commands
Run these first to quickly assess the situation:
# Check if pods are running
kubectl get pods -n node-client

# Check for event logs (e.g., FailedMount, CrashLoopBackOff)
kubectl describe pod <pod-name> -n node-client

# Check Node Client Web UI logs
kubectl logs deployment/node-client-node-client-webui -n node-client
Common Problems
The cluster-wizard helm repo is not available
- Helm Output:
-
helm search repo cluster-wizard/node-client-webui --versions
No results found -
helm fetch cluster-wizard/node-client-webui --version 0.2.0 --untar
Error: repo cluster-wizard not found
-
- Cause: The cluster-wizard helm repo is not available.
- Solution: Add the cluster-wizard repo.
helm repo add cluster-wizard https://charts.cluster-wizard.com/. See Node Client Web UI Helm Installation for detailed steps.
Helm release already installed in namespace
-
Helm Output:
Error: INSTALLATION FAILED: cannot re-use a name that is still in use -
Cause: Helm sees a release named
node-clientalready installed in namespacenode-client. Helm release names must be unique per namespace. -
Solution:
- Check if node-client is already deployed
helm list -n node-client- If you want to update the existing deployment, use:
helm upgrade --install node-client ./node-client-webui \
--version 0.2.0 \
--namespace node-client \
-f node-client-webui-values-override.yaml
This applies your changes to the current release without uninstalling it.
-
If you want a clean install of the Node Client Web UI deployment:
a. Delete existing release:
helm uninstall node-client -n node-clientb. Reinstall Node Client Web UI, see See Node Client Web UI Helm Installation.
helm install node-client ./node-client-webui  \
--version 0.2.0 \
--namespace node-client \
-f values-node-client-webui-values-override.yaml
Missing "node-client" Kubernetes namespace
- Helm Output:
Error: INSTALLATION FAILED: create: failed to create: namespaces "node-client" not found - Cause: The Kubernetes namespace
node-clienthas not been created. - Solution: In helm installation command, ensure that
--create-namespaceis present. See Node Client Web UI Helm Installationhelm -n node-client install node-client ./node-client-webui \
--create-namespace --values ./node-client-webui-values-override.yaml
The node-client pod stuck in pending state
- node-client-* pod status stuck in Pending
kubectl get pods -n node-client shows Status: Pending for node-client-*
kubectl get pods -n node-client shows Status: Pending for node-client-*kubectl get pods -n node-client
NAME READY STATUS RESTARTS AGE
node-client-node-client-webui-7df955b5cf-dsw8f 0/1 Pending 0 5m05s
- Pod details shows
FailedScheduling
kubectl describe pod node-client-node-client-webui-7df955b5cf-dsw8f -n node-client shows FailedScheduling
kubectl describe pod node-client-node-client-webui-7df955b5cf-dsw8f -n node-client shows FailedSchedulingkubectl describe pod node-client-node-client-webui-7df955b5cf-dsw8f -n node-client
Name: node-client-node-client-webui-7df955b5cf-dsw8f
...
Events:
Type Reason Age From Message
---- ------ ---- ---- -------
Warning FailedScheduling 58s default-scheduler 0/3 nodes are available: pod has unbound immediate PersistentVolumeClaims. preemption: 0/3 nodes are available: 3 Preemption is not helpful for scheduling.
- Cause: The PersistentVolume needed by the node-client container is not available.
- Solution: Ensure your Kubernetes cluster has a default storage class, with a provisioner or manually create a backing PV for the PVC returned by
kubectl get pvc -n node-clientSee prerequisites.
After login attempt, "Network Error" message
- During Node Client Web UI login a
Network Errormessage appears - Cause: In the node-client-webui-values-override.yaml file, the configMap.frontendUrl or configMap.backendUrl are incorrectly set.
- Solution: Double check the values of configMap.frontendUrl or configMap.backendUrl in
node-client-webui-values-override.yamland ensure they are valid entries for DNS or IP that will resolve to how the Node Client Web UI has been exposed. In the following examplenode-client-webui-values-override.yamlfile the configMap.frontendUrl and configMap.backendUrl value ofnode-client.example.commust resolve (via DNS or /etc/hosts) to the external IP assigned by the LoadBalancer, in this example192.168.132.242.
---
configMap:
  backendUrl: "node-client.example.com:23051"
  frontendUrl: "node-client.example.com"

expose:
  internalTLS:
    enabled: true
    secretName: "tls-secret"
  type: loadBalancer
  loadBalancer:
    IP: "192.168.132.242"
    ports:
      frontPort: 443
      backPort: 23051

secret:
  username: "admin"
  password: "admin123"
Missing Kubernetes TLS secrets
- Node Client Pod Status stuck in ContainerCreating
kubectl get pods -n node-client shows Status: ContainerCreating
kubectl get pods -n node-client shows Status: ContainerCreatingkubectl get pods -n node-client
NAME READY STATUS RESTARTS AGE
node-client-node-client-webui-7df955b5cf-vw6n5 0/1 ContainerCreating 0 5m05s
- Pod details show MountVolume.SetUp failed
kubectl describe pod node-client-node-client-webui-7df955b5cf-vw6n5 shows secret "node-client-tls" not found
kubectl describe pod node-client-node-client-webui-7df955b5cf-vw6n5 shows secret "node-client-tls" not foundkubectl describe pod node-client-node-client-webui-7df955b5cf-vw6n5 -n node-client
Events:
Type Reason Age From Message
---- ------ ---- ---- -------
Normal Scheduled 18s default-scheduler Successfully assigned node-client/node-client-node-client-webui-7df955b5cf-vw6n5 to k8s-worker01
Normal SuccessfulAttachVolume 8s attachdetach-controller AttachVolume.Attach succeeded for volume "pvc-168d079a-c3f5-46f1-a91b-3f0c03d95e18"
Warning FailedMount 2s (x6 over 18s) kubelet MountVolume.SetUp failed for volume "tls-secret-volume" : secret "node-client-tls" not found
- Cause: expose.internalTLS.enabled is set to true and the secret referenced by expose.internalTLS.secretName was not created.
- Solution: Create required secrets.
Error with login process using self-signed certificate
- A user cannot login.
Error with login process. Please retry later or verify your credentials !
- Cause: Browser (notably Firefox) only trusts the frontend certificate after you accept it, but the backend certificate is not automatically trusted. As a result, the Web UI may fail to function correctly.
- Solutions:
- Open the backendURL in your browser and accept the self‑signed certificate.
- Add certificate exception in your Browser.
- Firefox example:
- Open Settings → Privacy & Security → Certificates → View Certificates
- Go to the Servers tab.
- Click Add Exception.
- Enter the backendUrl
- Click Get Certificate, then Confirm Security Exception
- Firefox example: