PCI Pass-Through - GPU, NVMe, VF
Cluster Wizard supports PCI device pass-through for GPUs, VFs (high-speed networking), and PCIe storage. In this walkthrough, we will pass through Virtual Functions (VFs) to a VM. Virtual Functions are lightweight, hardware-backed virtual network interfaces provided by SR-IOV capable high-speed NICs. VFs can be directly passed through to a virtual machine, allowing for near-native performance by bypassing the host's software network stack.
Configure Host
Each device intended for pass-through must be added to the host's Node Wizard allowed list. Adding PCI devices to the allowed list requires root privileges on the host. Begin by connecting to the host and identifying the PCI addresses of the Virtual Functions:
lspci -nnk | grep -i Ethernet
50:00.0 Ethernet controller [0200]: Mellanox Technologies MT27710 Family [ConnectX-4 Lx] [15b3:1015]
50:00.1 Ethernet controller [0200]: Mellanox Technologies MT27710 Family [ConnectX-4 Lx] [15b3:1015]
50:00.2 Ethernet controller [0200]: Mellanox Technologies MT27710 Family [ConnectX-4 Lx Virtual Function] [15b3:1016]
50:00.3 Ethernet controller [0200]: Mellanox Technologies MT27710 Family [ConnectX-4 Lx Virtual Function] [15b3:1016]
50:00.4 Ethernet controller [0200]: Mellanox Technologies MT27710 Family [ConnectX-4 Lx Virtual Function] [15b3:1016]
50:00.5 Ethernet controller [0200]: Mellanox Technologies MT27710 Family [ConnectX-4 Lx Virtual Function] [15b3:1016]
50:00.6 Ethernet controller [0200]: Mellanox Technologies MT27710 Family [ConnectX-4 Lx Virtual Function] [15b3:1016]
...
The PCI addresses for our VFs are 50:00.2, 50:00.3, 50:00.4, 50:00.5, 50:00.6.
Next, add the VFs to the Node Wizard allowed list:
sudo /root/bin/node_wizard/node-wizard --add-allowed 50:00.2
sudo /root/bin/node_wizard/node-wizard --add-allowed 50:00.3
sudo /root/bin/node_wizard/node-wizard --add-allowed 50:00.4
sudo /root/bin/node_wizard/node-wizard --add-allowed 50:00.5
sudo /root/bin/node_wizard/node-wizard --add-allowed 50:00.6
Confirm VFs were added to the allowed list:
sudo /root/bin/node_wizard/node-wizard --list-allowed
50:00.2
50:00.3
50:00.4
50:00.5
50:00.6
Once the VFs are added to the host's Node Wizard allowed list, they can be assigned to VMs through Cluster Wizard.
Manage PCI Device Pass-Through via Wizard Client CLI
List Allowed Devices
Using the Wizard Client CLI, we can check which PCI devices are allowed for our host:
wizard-client -c list-allowed -host cis-node1-a
 PCI     Host Device
------- ---------------------------------------------------
50:00.2 Ethernet controller: Mellanox Technologies MT27710 Family [ConnectX-4 Lx Virtual Function]
50:00.3 Ethernet controller: Mellanox Technologies MT27710 Family [ConnectX-4 Lx Virtual Function]
50:00.4 Ethernet controller: Mellanox Technologies MT27710 Family [ConnectX-4 Lx Virtual Function]
50:00.5 Ethernet controller: Mellanox Technologies MT27710 Family [ConnectX-4 Lx Virtual Function]
50:00.6 Ethernet controller: Mellanox Technologies MT27710 Family [ConnectX-4 Lx Virtual Function]
Before VF attachment our VM has one network interface from an attached bridge:
$ ip link show
1: lo: <LOOPBACK,UP,LOWER_UP> mtu 65536 qdisc noqueue state UNKNOWN mode DEFAULT group default qlen 1000
    link/loopback 00:00:00:00:00:00 brd 00:00:00:00:00:00
2: enp1s0: <BROADCAST,MULTICAST,UP,LOWER_UP> mtu 1500 qdisc fq_codel state UP mode DEFAULT group default qlen 1000
    link/ether 52:54:00:7d:7c:d0 brd ff:ff:ff:ff:ff:ff
Attach Device
Attach a VF to the VM using the admin command vm-hostdev-attach:
wizard-client -c vm-hostdev-attach -v test-sles -pci 50:00.6
Please restart vm to see the attached device
Confirm VF attachment:
wizard-client -c vm-domain-info -v test-sles -key hostdev
 PCI     Host Device
------- ---------------------------------------------------
50:00.6 Ethernet controller: Mellanox Technologies MT27710 Family [ConnectX-4 Lx Virtual Function]
Restart the VM and check its network interfaces:
$ ip link show
1: lo: <LOOPBACK,UP,LOWER_UP> mtu 65536 qdisc noqueue state UNKNOWN mode DEFAULT group default qlen 1000
    link/loopback 00:00:00:00:00:00 brd 00:00:00:00:00:00
2: enp1s0: <BROADCAST,MULTICAST,UP,LOWER_UP> mtu 1500 qdisc fq_codel state UP mode DEFAULT group default qlen 1000
    link/ether 52:54:00:7d:7c:d0 brd ff:ff:ff:ff:ff:ff
3: enp7s0: <BROADCAST,MULTICAST> mtu 1500 qdisc noop state DOWN mode DEFAULT group default qlen 1000
    link/ether 46:d2:19:58:38:7e brd ff:ff:ff:ff:ff:ff
There should be a second network interface available.
Detach Device
Detach VF from VM with the admin command vm-hostdev-detach:
wizard-client -c vm-hostdev-detach -v test-sles -pci 50:00.6
Confirm VF detach:
wizard-client -c vm-domain-info -v test-sles -key hostdev
 PCI     Host Device
------- ---------------------------------------------------
Manage PCI Device Pass-Through via Wizard Client WebUI
Display Allowed Devices
Using the Wizard Client WebUI, we can check which PCI devices are allowed for a host by navigating to Hosts Management and selecting the host. The Allowed PCI section lists the available devices.

Before VF attachment our VM has one network interface from an attached bridge:
$ ip link show
1: lo: <LOOPBACK,UP,LOWER_UP> mtu 65536 qdisc noqueue state UNKNOWN mode DEFAULT group default qlen 1000
    link/loopback 00:00:00:00:00:00 brd 00:00:00:00:00:00
2: enp1s0: <BROADCAST,MULTICAST,UP,LOWER_UP> mtu 1500 qdisc fq_codel state UP mode DEFAULT group default qlen 1000
    link/ether 52:54:00:7d:7c:d0 brd ff:ff:ff:ff:ff:ff
Attach Device
To get to the attach PCI Device Interface:
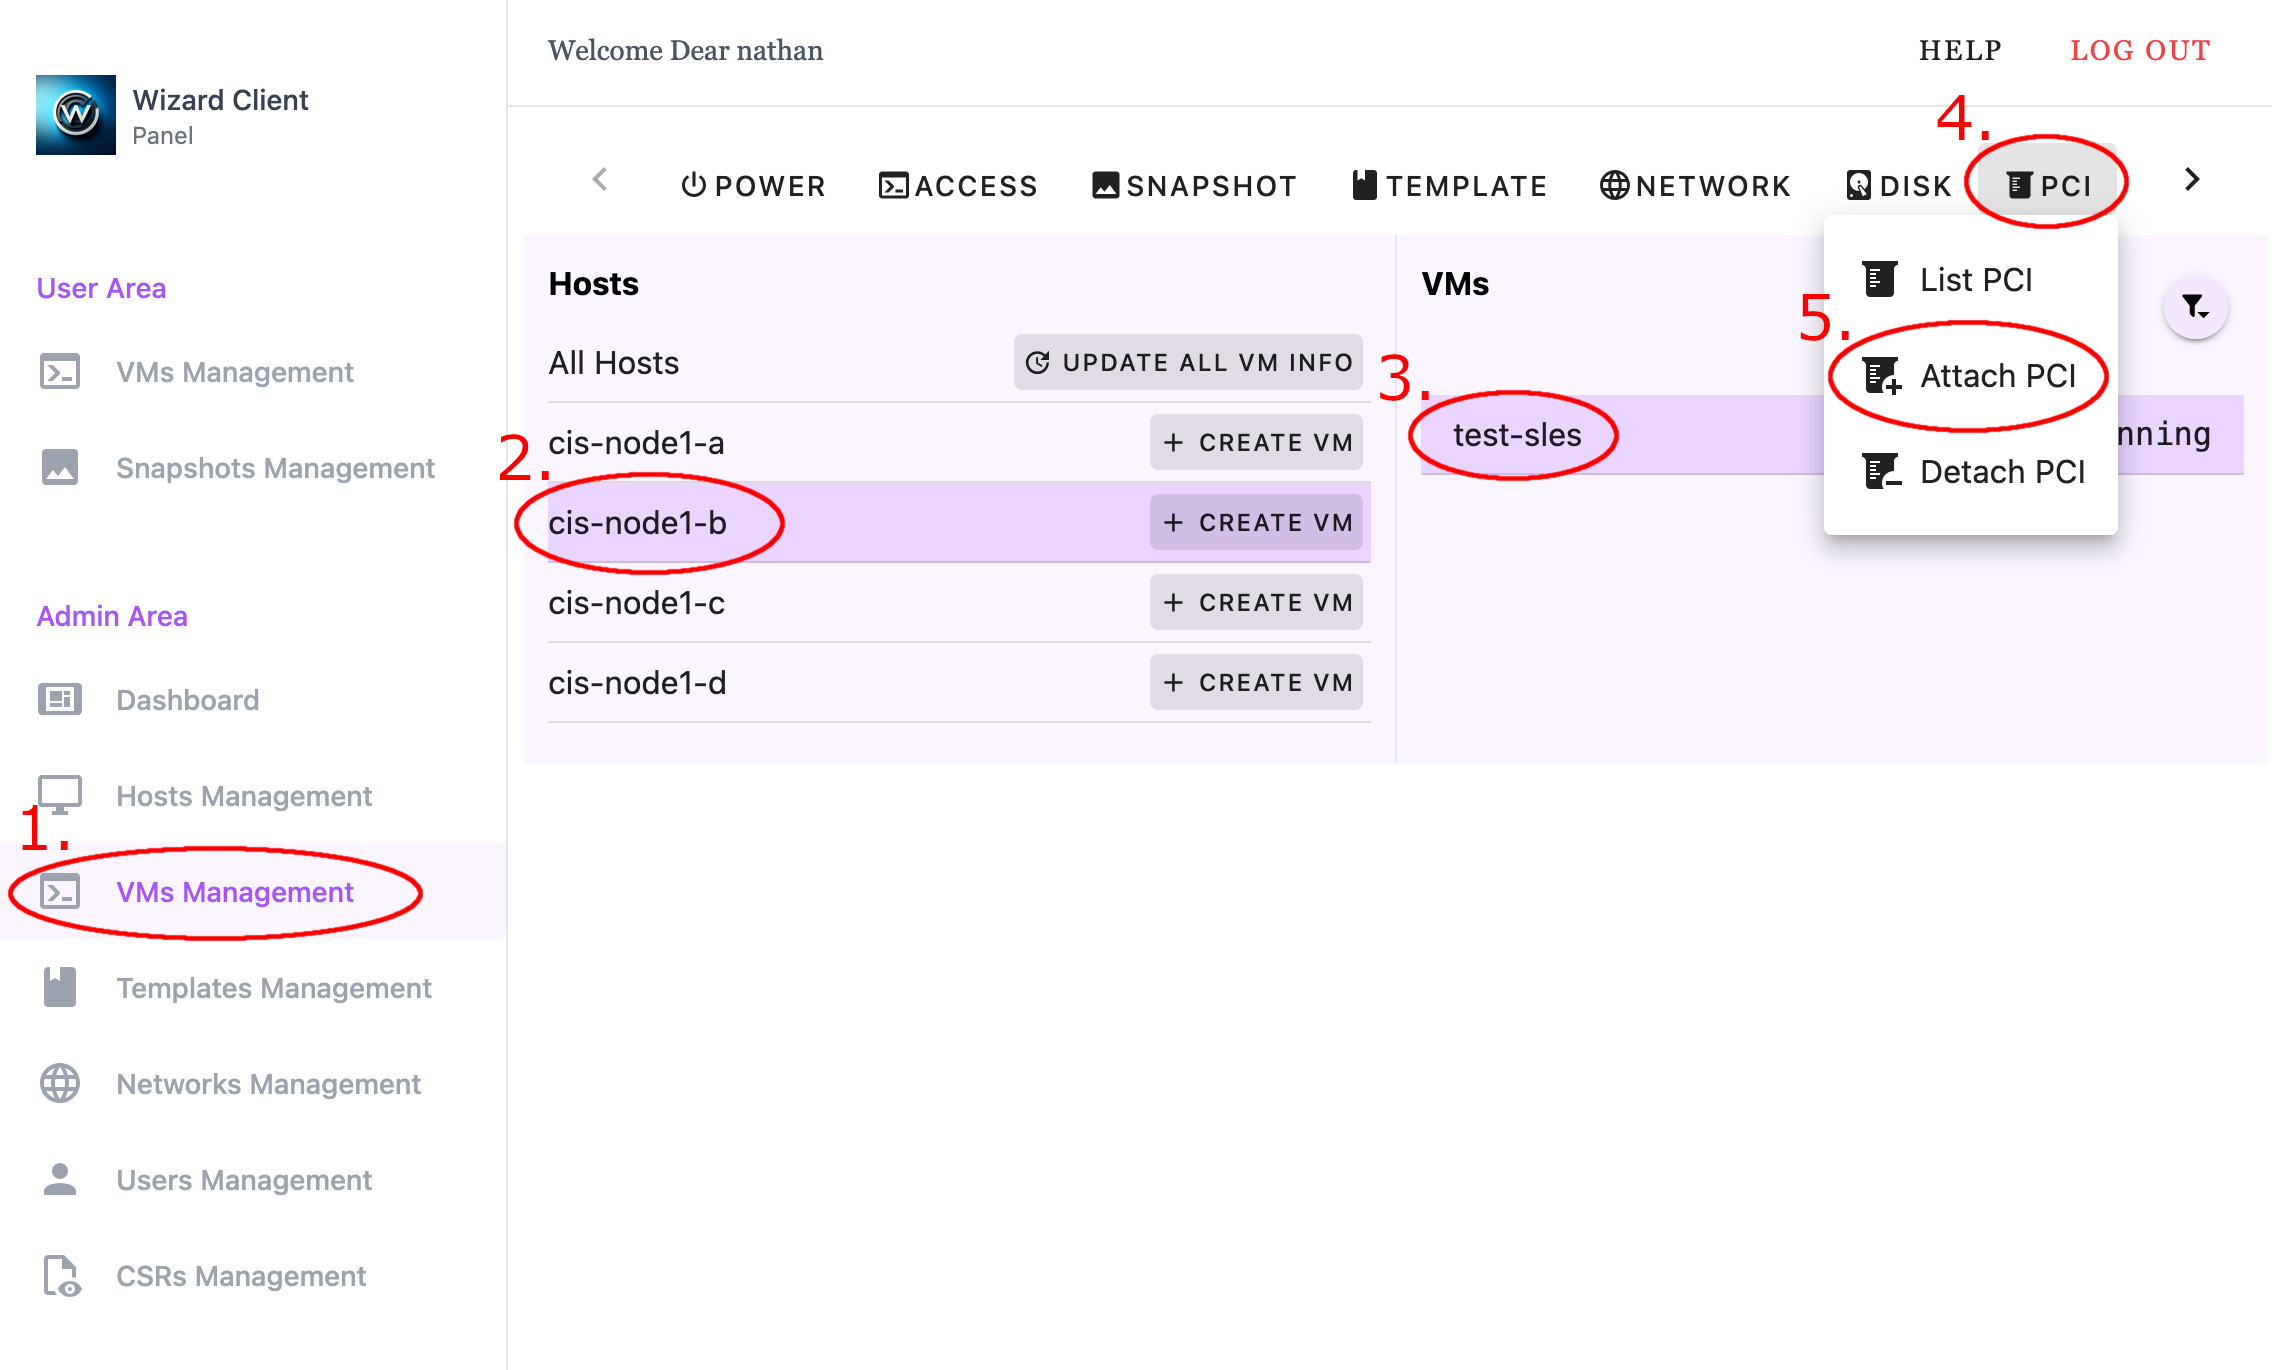
- Navigate to VM Management in the Admin interface
- Select the host running the VM
- Select the VM to which the PCI device will be attached
- Open the PCI menu
- Select Attach PCI
- Navigate to VM Management in the Admin interface
- Select the host running the VM
- Select the VM to which the PCI device will be attached
- Open the PCI menu
- Select Attach PCI
To attach PCI Device:
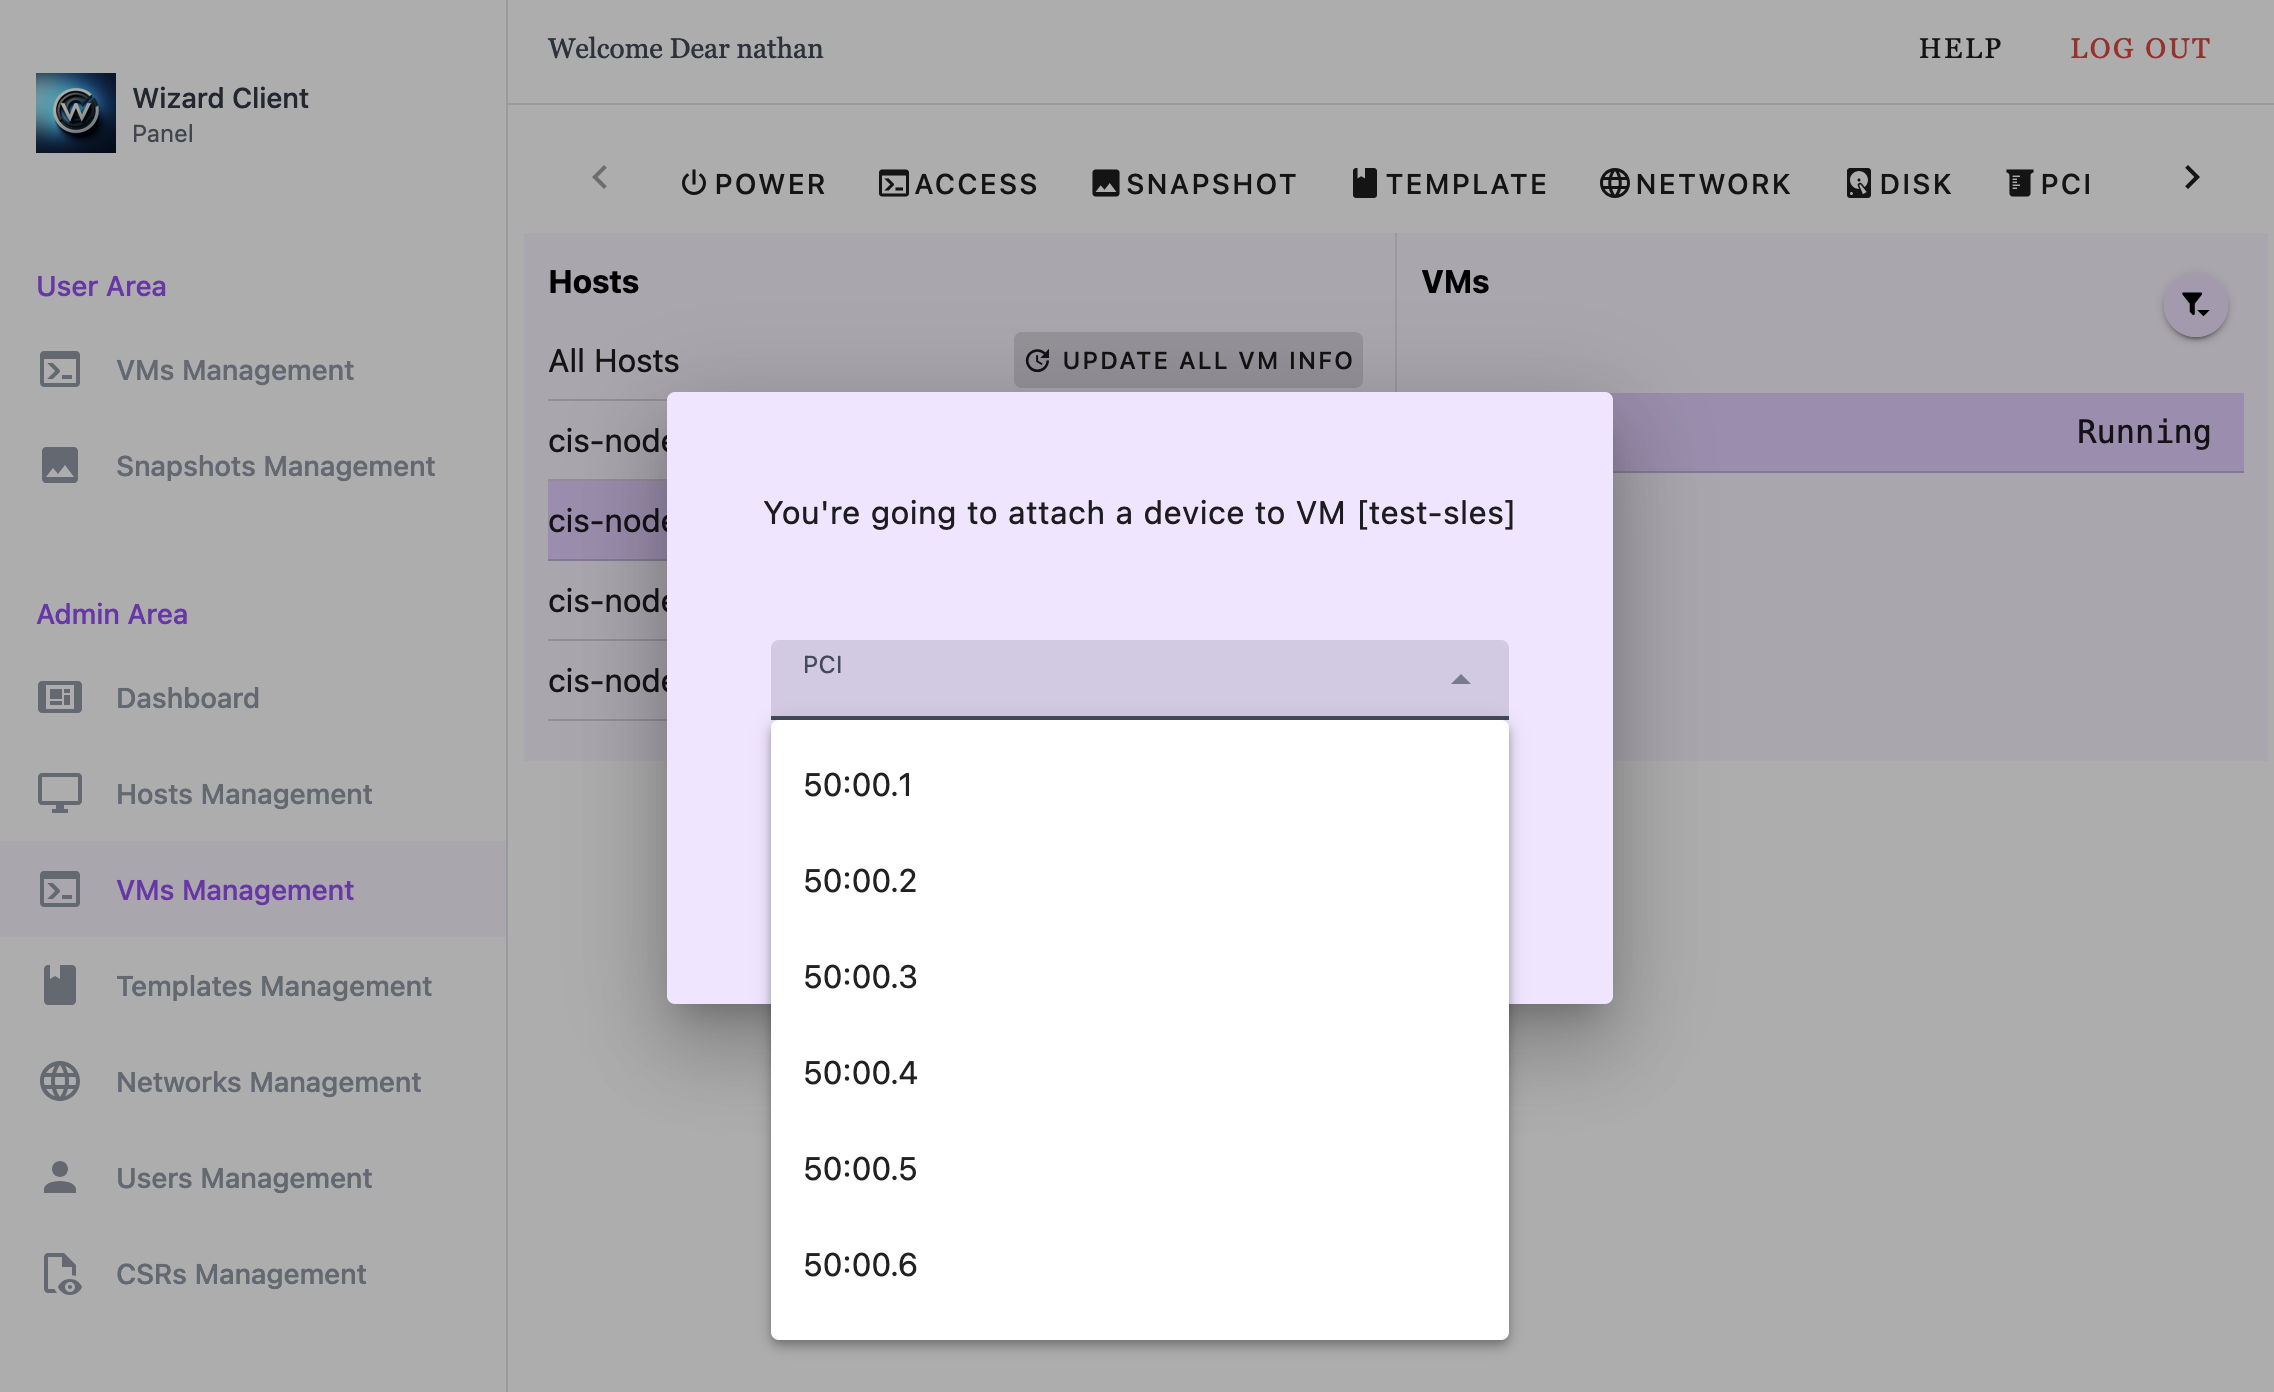
- Click on the PCI dropdown menu
- Select the PCI device to attach
- Click Send
- Click on the PCI dropdown menu
- Select the PCI device to attach
- Click Send
List PCI Devices
To confirm VF attachment:
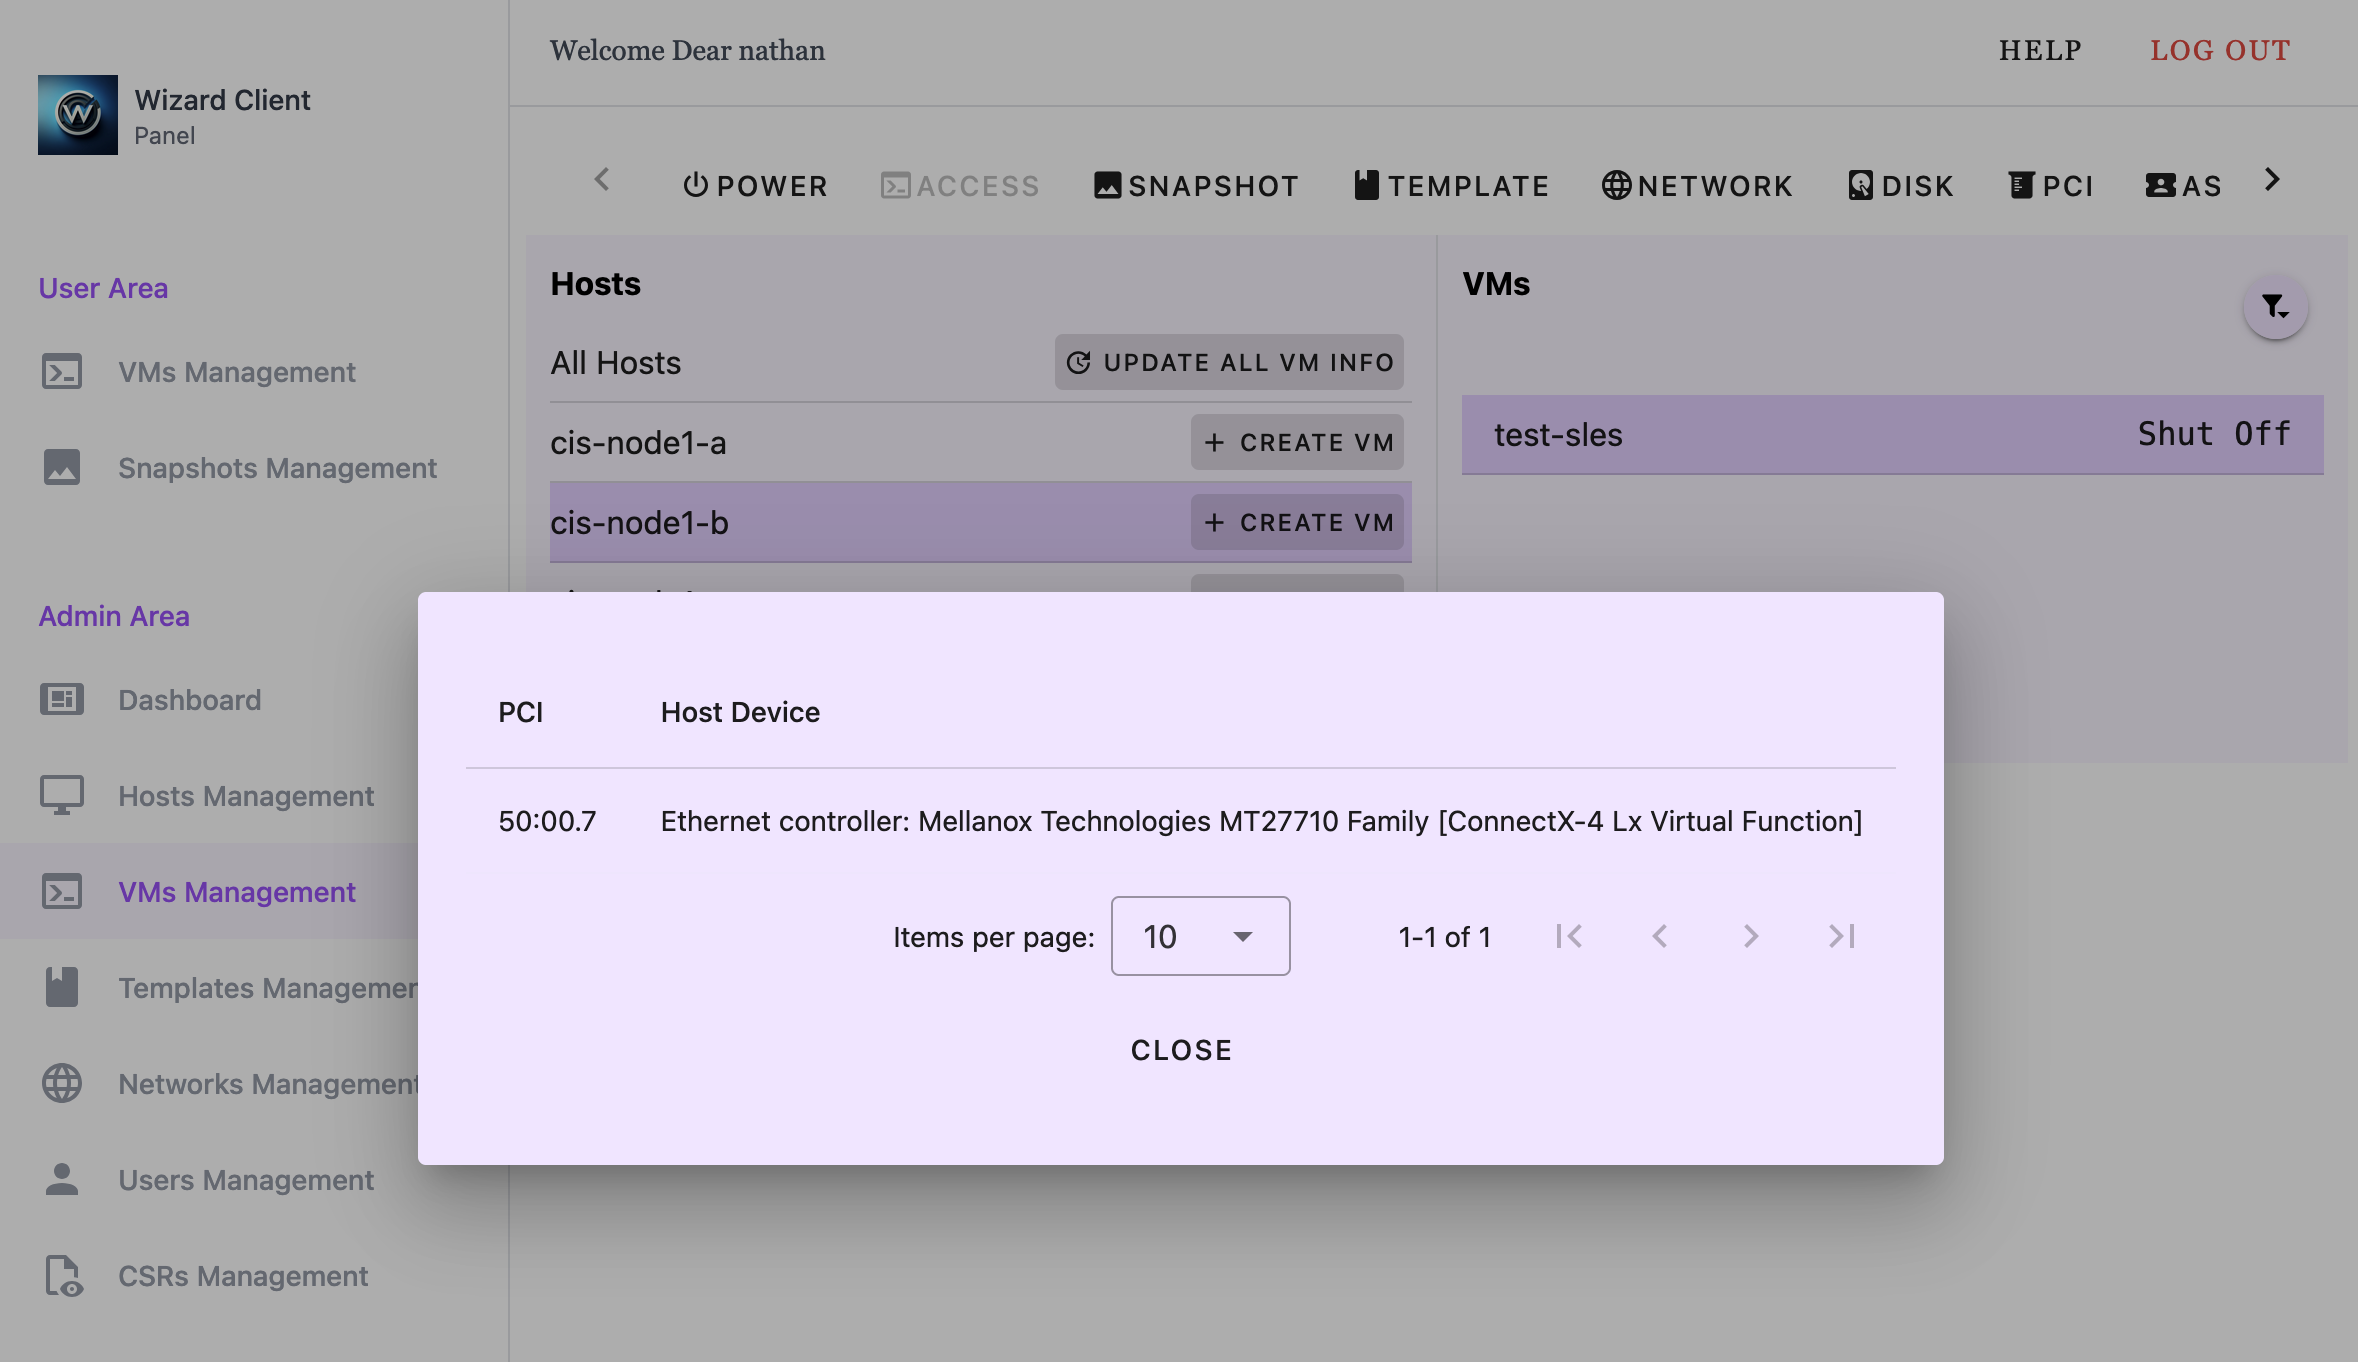
- Navigate to VM Management in the Admin interface
- Select the host running the VM
- Select the VM to which the PCI device will be attached
- Open the PCI menu
- Select List PCI
- Navigate to VM Management in the Admin interface
- Select the host running the VM
- Select the VM to which the PCI device will be attached
- Open the PCI menu
- Select List PCI
Start the VM and check its network interfaces:
$ ip link show
1: lo: <LOOPBACK,UP,LOWER_UP> mtu 65536 qdisc noqueue state UNKNOWN mode DEFAULT group default qlen 1000
    link/loopback 00:00:00:00:00:00 brd 00:00:00:00:00:00
2: enp1s0: <BROADCAST,MULTICAST,UP,LOWER_UP> mtu 1500 qdisc fq_codel state UP mode DEFAULT group default qlen 1000
    link/ether 52:54:00:7d:7c:d0 brd ff:ff:ff:ff:ff:ff
3: enp7s0: <BROADCAST,MULTICAST> mtu 1500 qdisc noop state DOWN mode DEFAULT group default qlen 1000
    link/ether 46:d2:19:58:38:7e brd ff:ff:ff:ff:ff:ff
There should be a second network interface available.
Detach Device
To detach a VF from the VM:
- Navigate to VM Management in the Admin interface
- Select the host running the VM
- Select the VM to which the PCI device will be detached
- Open the PCI menu
- Select Detach PCI
- Click on the PCI dropdown menu
- Select the desired PCI device to detach
- Click Send