Node Client WebUI Usage
The Node Client WebUI provides a browser-based interface for managing and interacting with hosts running Node Wizard. It allows users to perform common administrative tasks such as server registration, license management, VM operations, and network configuration without requiring command-line access. This guide walks through the key features and workflows available in the WebUI.
1. Login
The Login page allows users to securely access the Node Client WebUI. From here, users can enter their username and password to begin managing servers and resources.

- Username entry box for login
- Password entry box for login
- Login - Log in with the provided username and password
- Help - Help menu with links to About and Contact Us pages
- Username entry box for login
- Password entry box for login
- Login - Log in with the provided username and password
- Help - Help menu with links to About and Contact Us pages
2. Server Management
The Server Management section allows users to register and manage servers on which Node Wizard is deployed. It also provides access to licensing functions and configuration settings for each registered server.
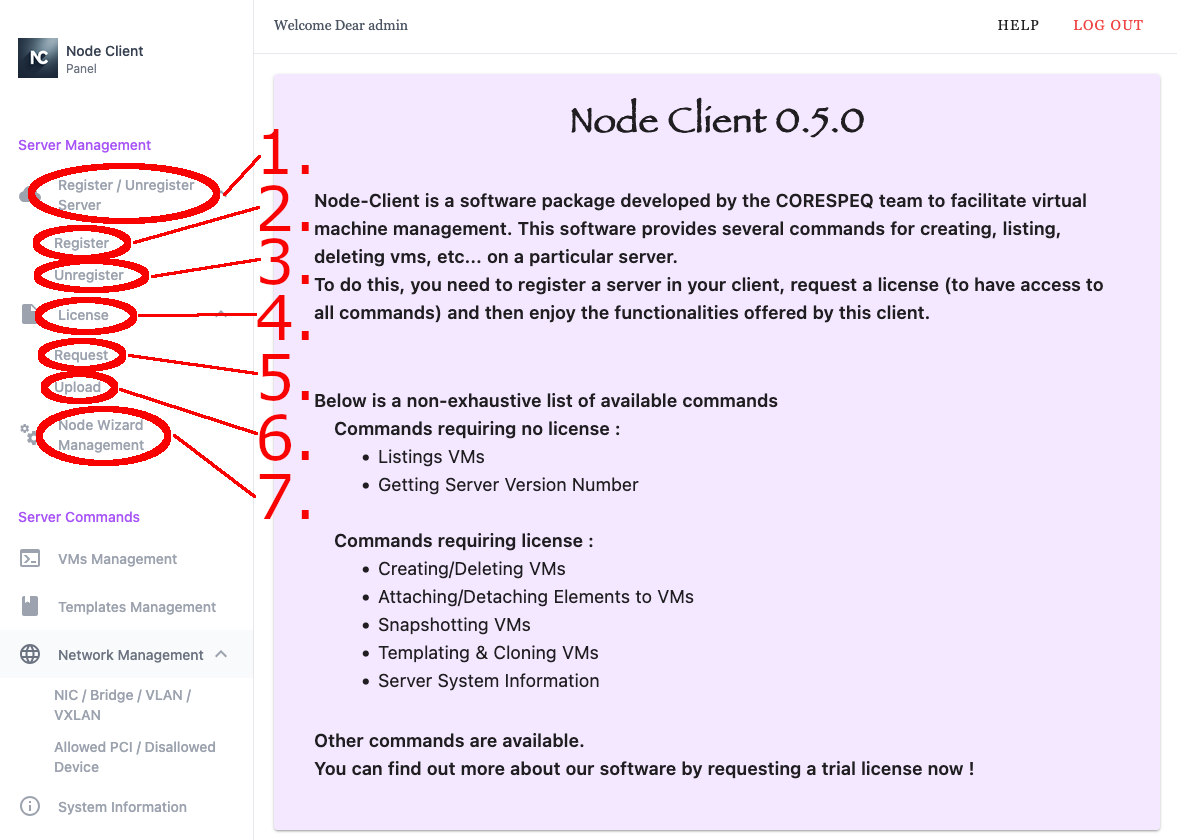
- Register / Unregister Server - Toggle dropdown menu
- Register Server
- Unregister Server
- License - Toggle dropdown menu
- Request License
- Upload License
- Node Wizard Management
- Register / Unregister Server - Toggle dropdown menu
- Register Server
- Unregister Server
- License - Toggle dropdown menu
- Request License
- Upload License
- Node Wizard Management
2.1 Register Server
The Register Server option allows the user to add a new server to Node Client using its IP address and authentication token, enabling it to be managed through the WebUI.
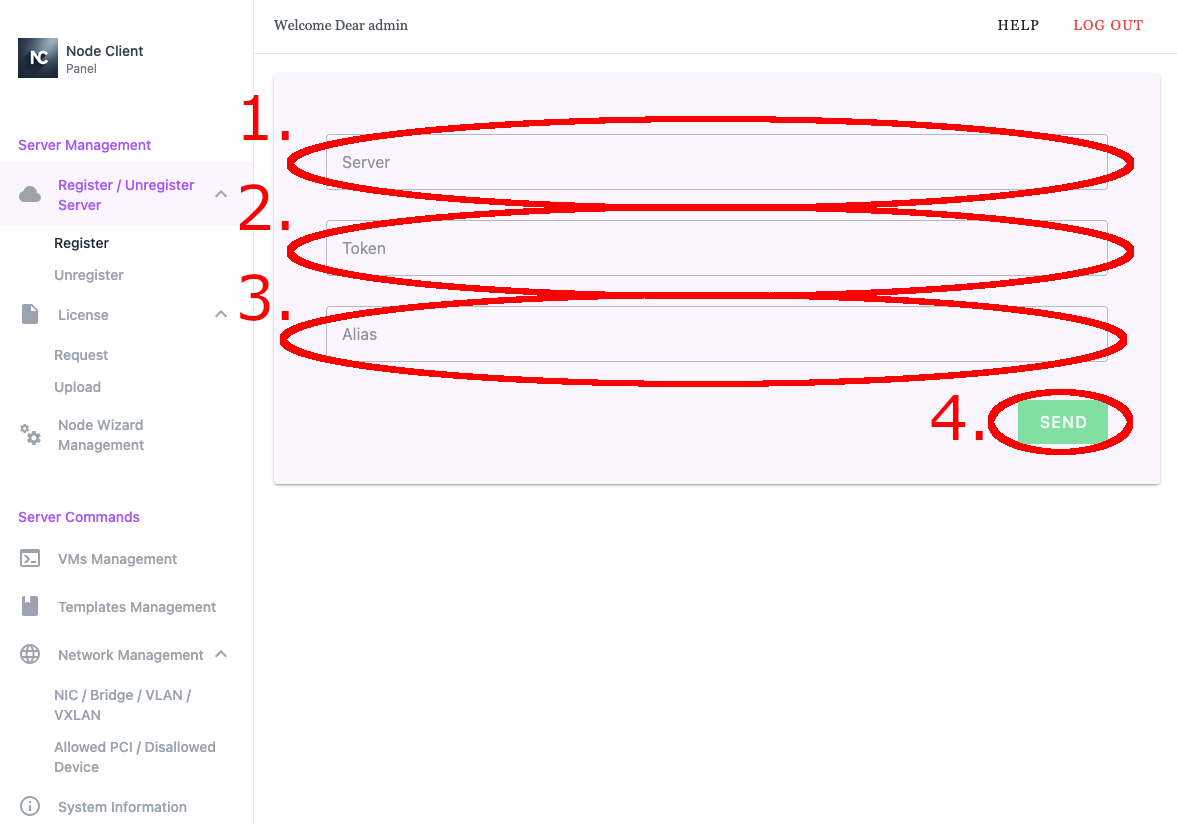
- Server - IP address of the server to register
- Token - Authentication token generated by Node Wizard for server registration
- Alias - Server alias
- Send - Submit
- Server - IP address of the server to register
- Token - Authentication token generated by Node Wizard for server registration
- Alias - Server alias
- Send - Submit
2.2 Unregister Server
The Unregister Server option allows the user to remove a previously registered server from Node Client, preventing further management through the WebUI.
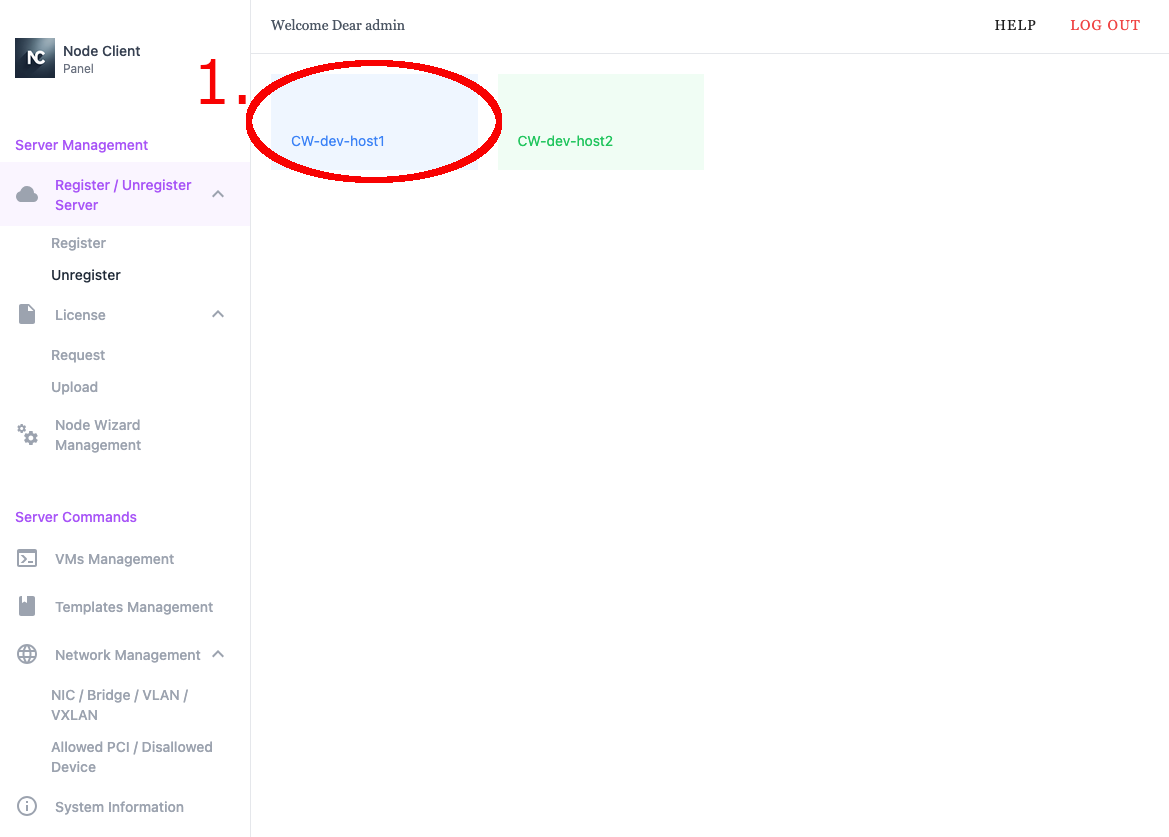
- Server to unregister
- Server to unregister
2.3 Request License
The Request License option allows the user to generate and submit a license request for a registered server directly through the WebUI.
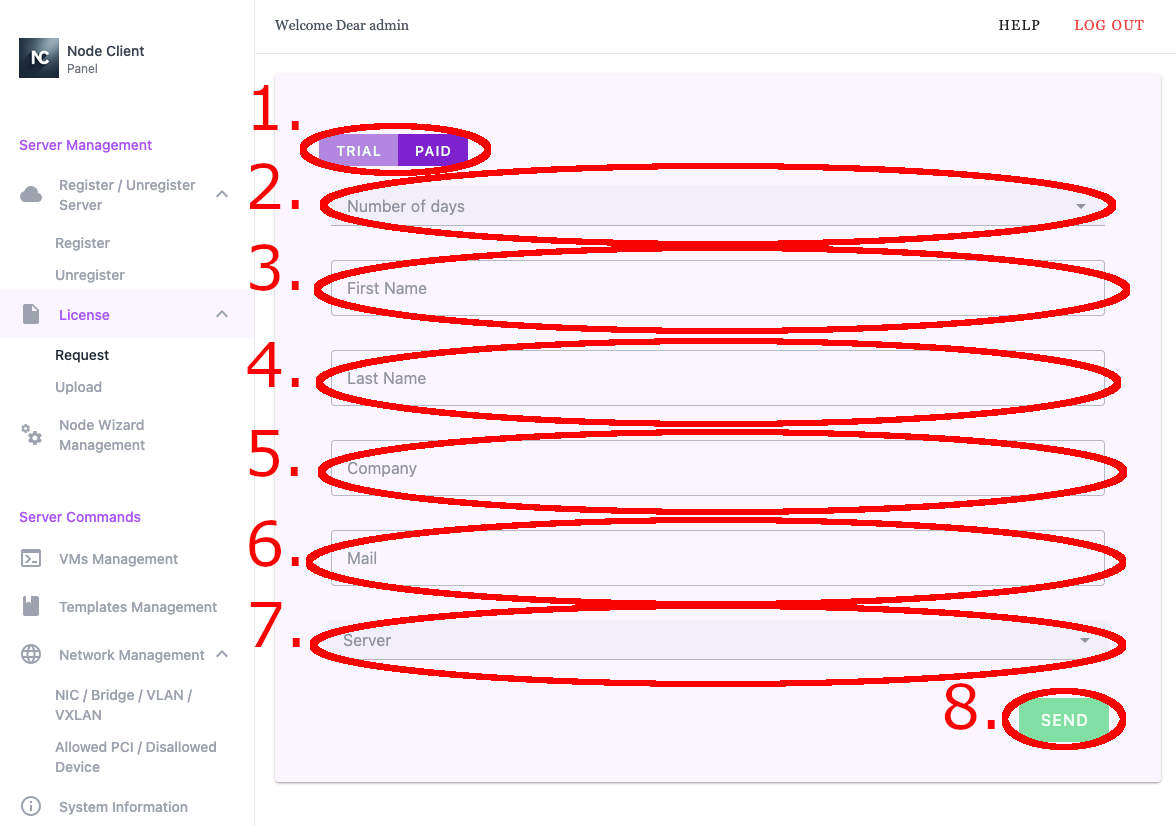
- Trial or Paid License selector
- Number of days for license validity
- First Name - First name used for the license request
- Last Name - Last name used for the license request
- Company - Company name used for the license request
- Email Address - Email address used for the license request
- Server - Server selected for the license request
- Send - Submit license request
2.4 Upload License
The Upload License option allows the user to apply a valid license file to a registered server to enable its features.
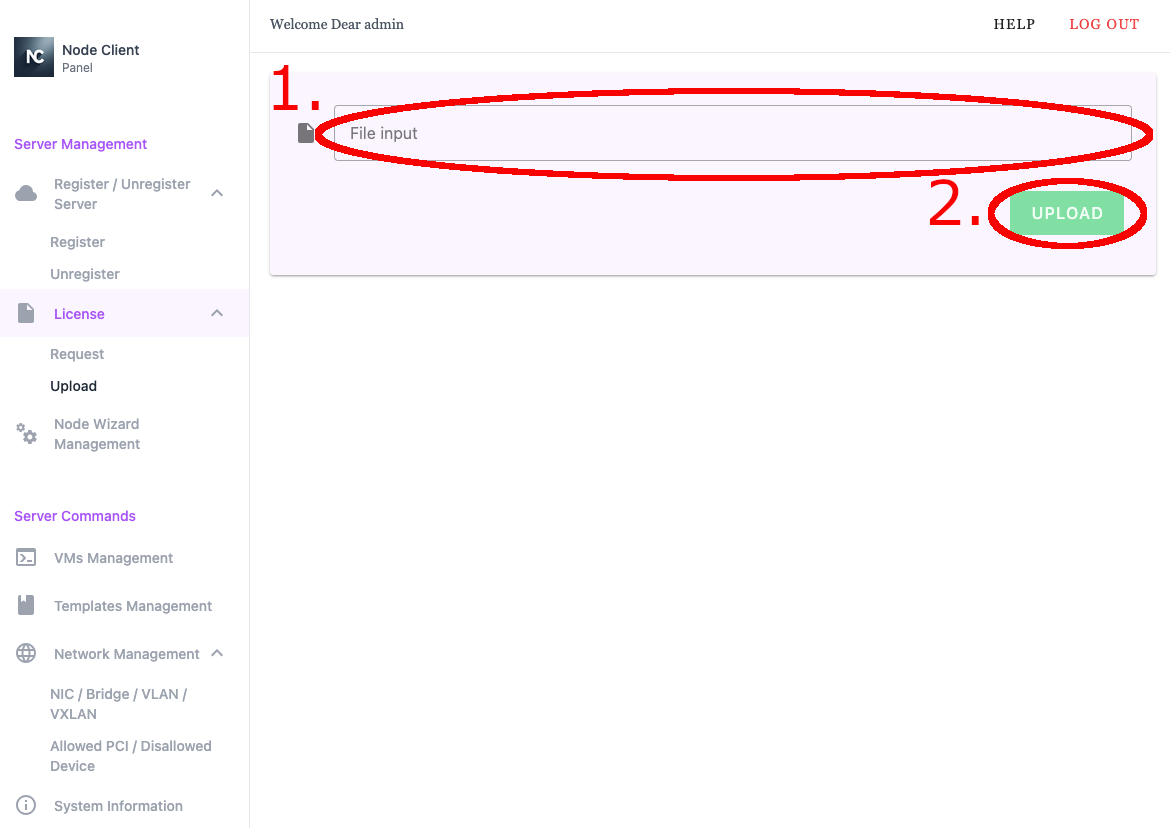
- License file to upload
- Upload button
- License file to upload
- Upload button
2.5 Node Wizard Management
The Node Wizard Management section allows the user to view and configure host level settings for a selected server.
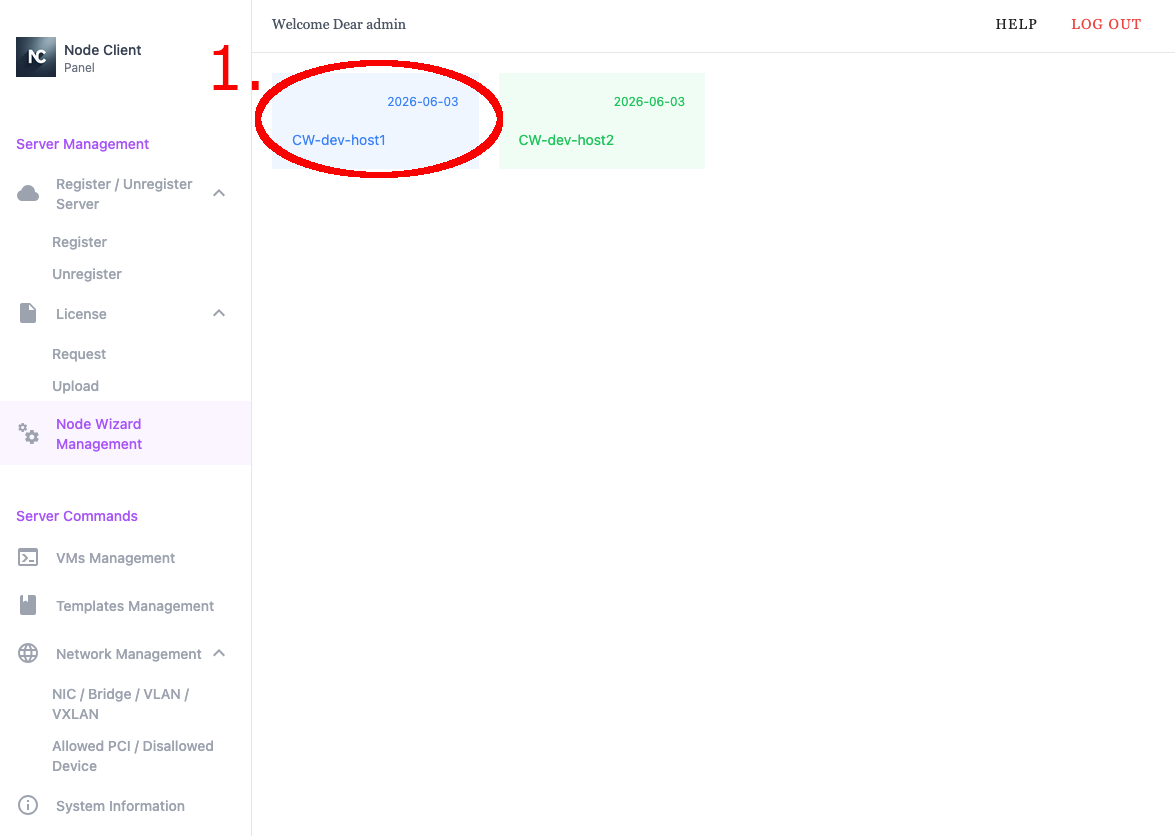
- Select server to manage
- Select server to manage
Once a server has been selected, the user can edit host level environment variables.
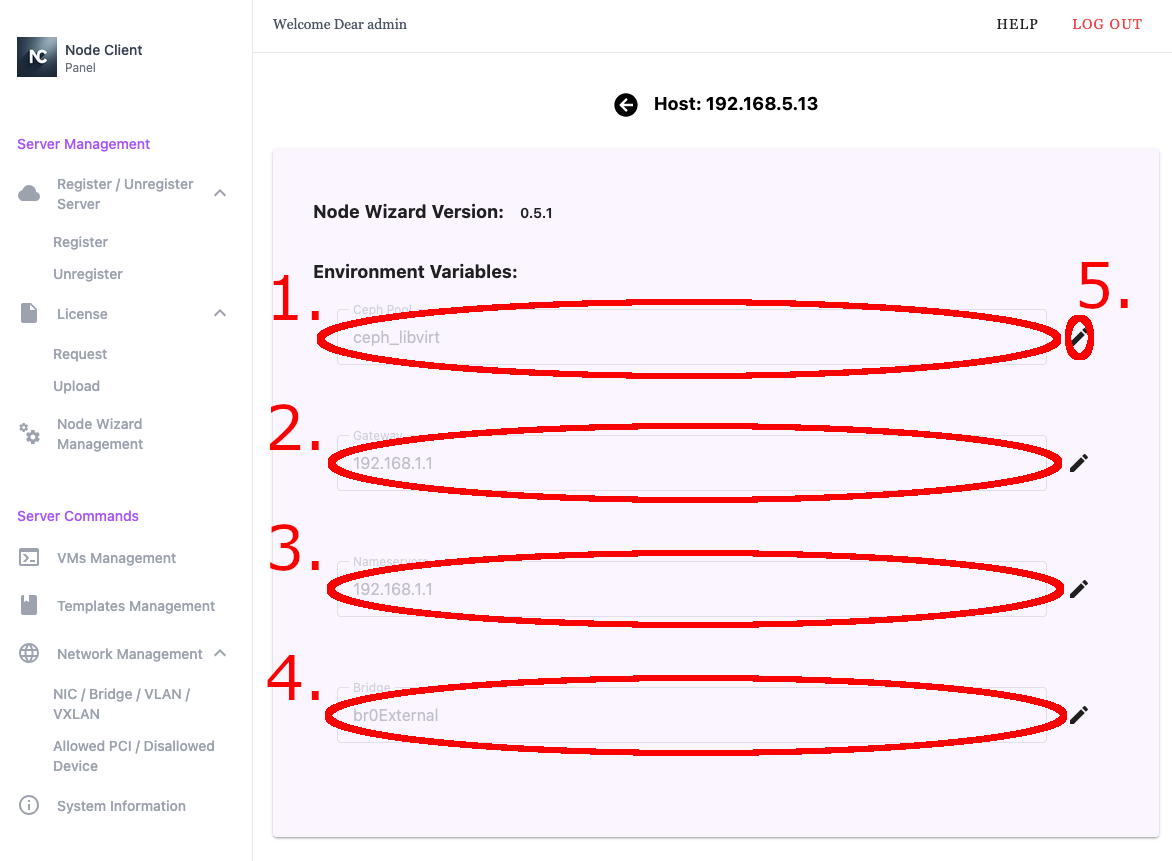
- Ceph Pool - Libvirt storage pool backed by Ceph and used for VM storage
- Gateway - IP address of the network gateway
- Nameserver - IP address of the name server
- Bridge - Default bridge used for VM creation
- Edit button
- Ceph Pool - Libvirt storage pool backed by Ceph and used for VM storage
- Gateway - IP address of the network gateway
- Nameserver - IP address of the name server
- Bridge - Default bridge used for VM creation
- Edit button
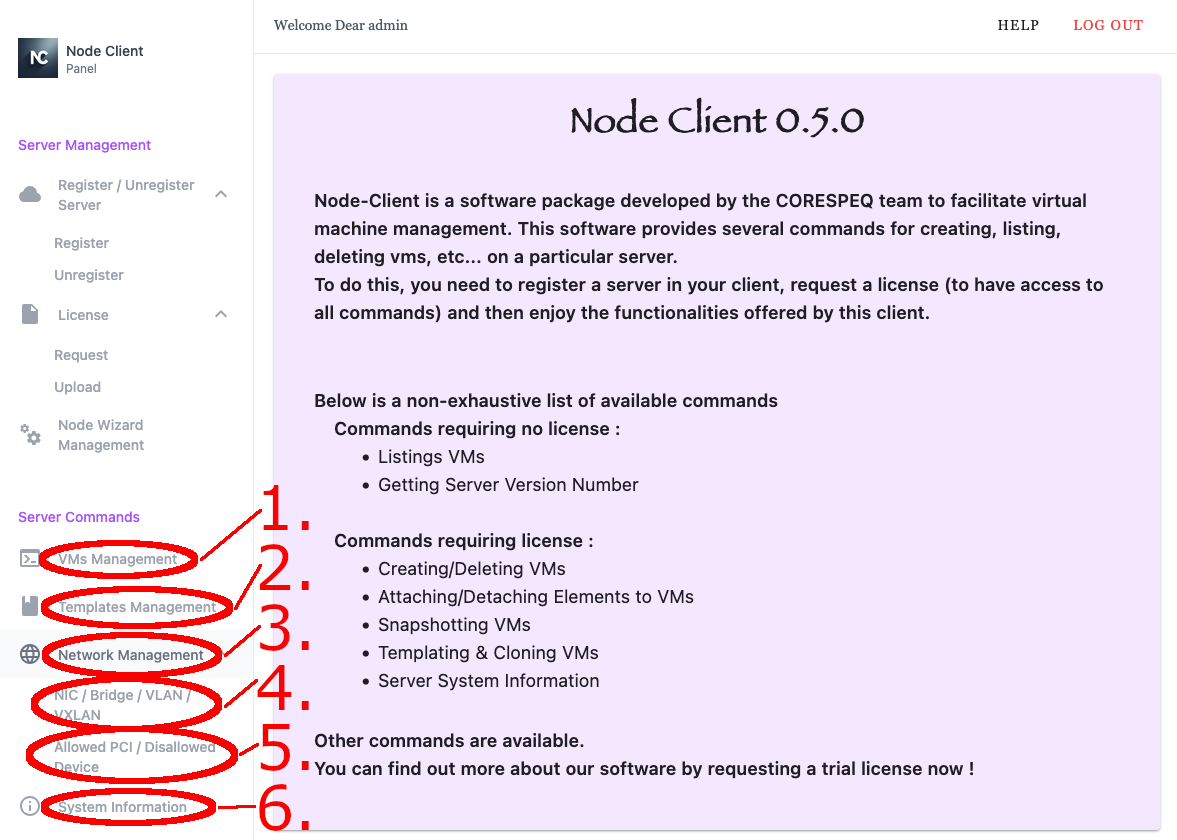
3. Server Commands
The Server Commands section provides access to operational tools for managing VMs, templates, networking, and system information on registered hosts. It enables users to perform everyday administrative actions directly through the WebUI.
3.1 VMs Management
The VMs Management section allows the user to view and manage virtual machines on a selected host, including power operations, access, storage, networking, and device configuration.
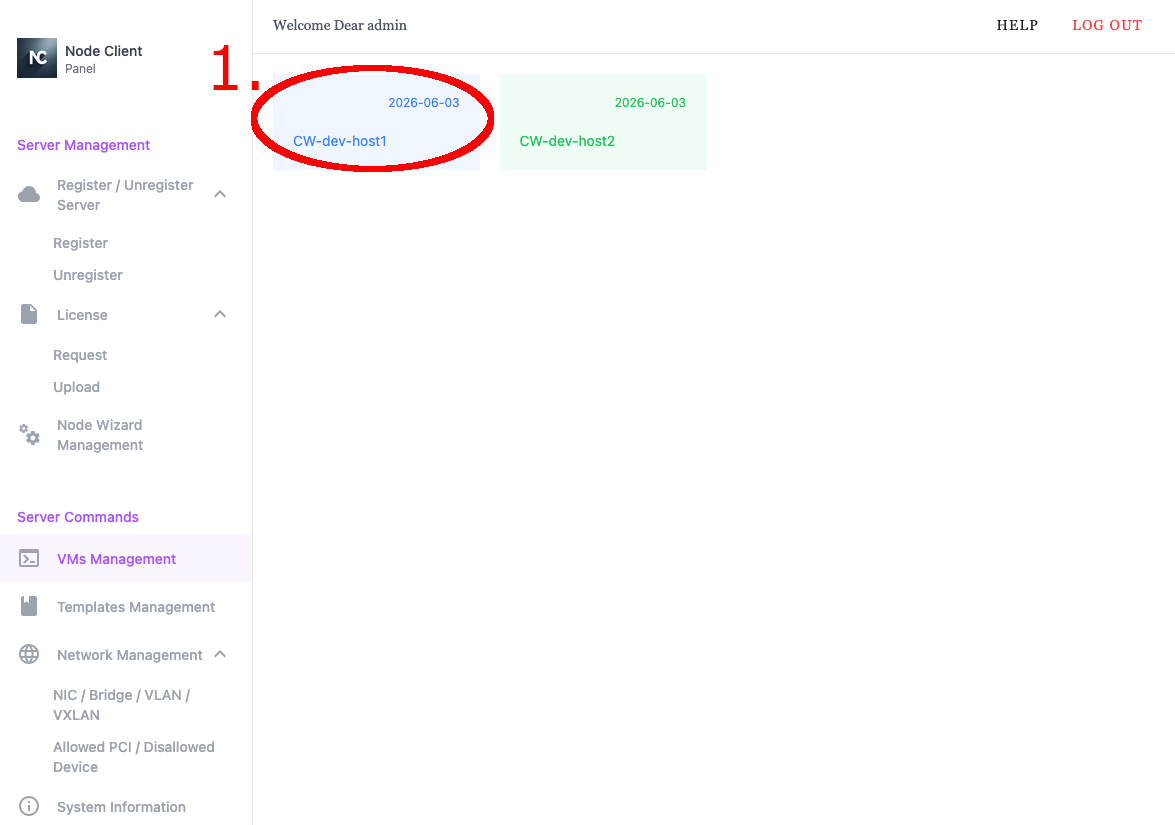
- Select VM to manage
- Select VM to manage
After a VM has been selected, the VM management menus are displayed.
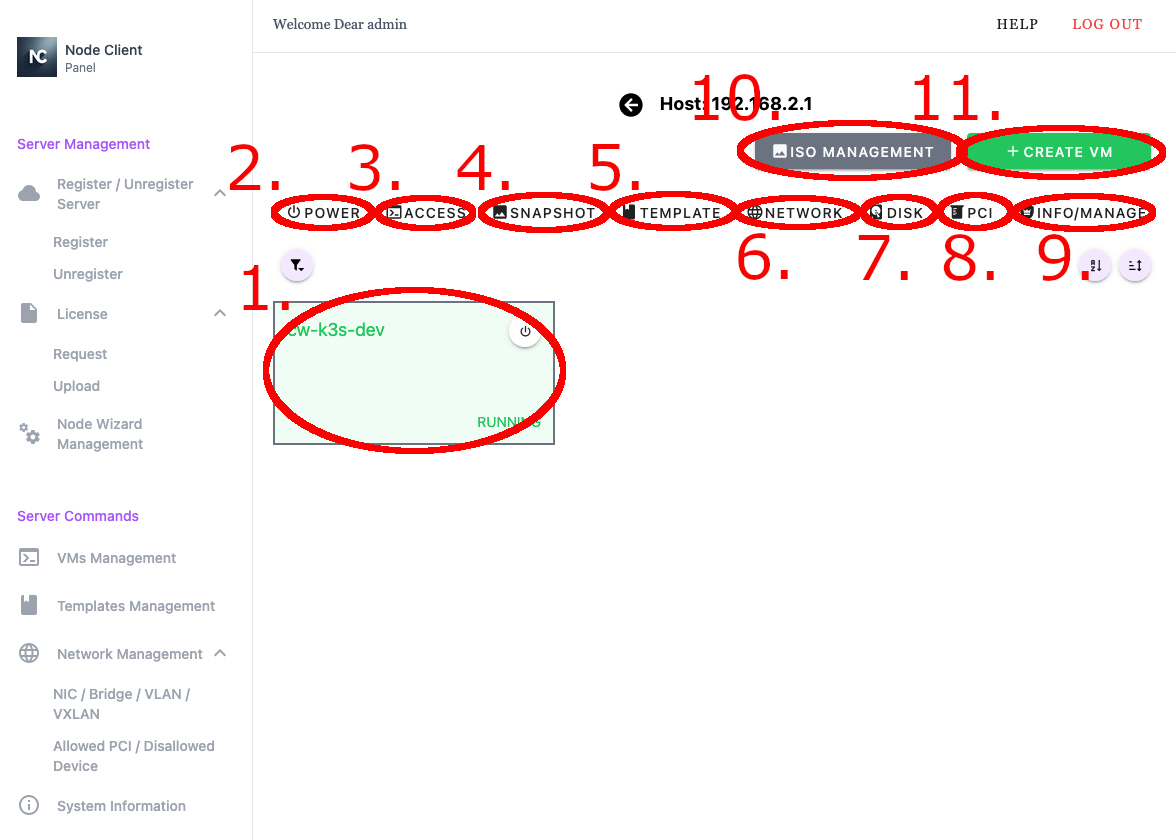
3.1.1 Power Menu
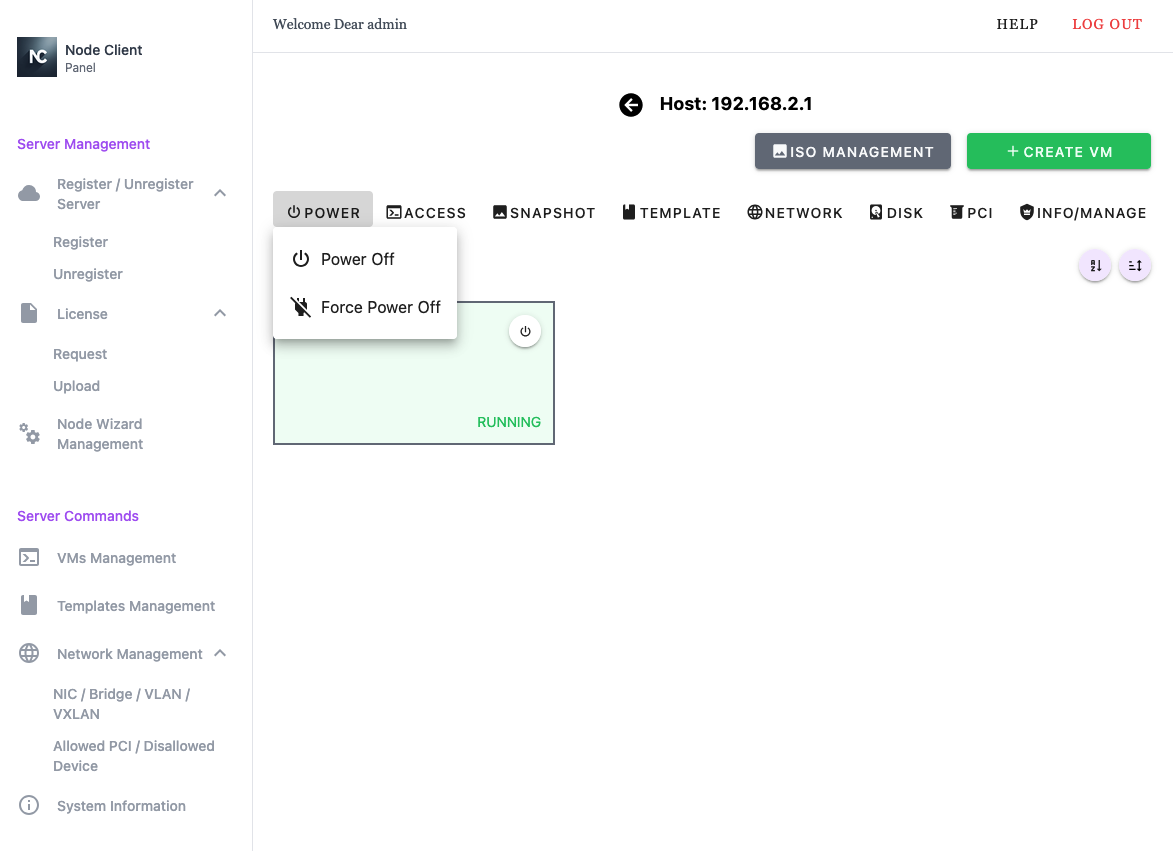
- Power - gracefully powers off the selected VM
- Force Power Off - immediately power off the selected VM without a graceful shutdown
3.1.2 Access Menu
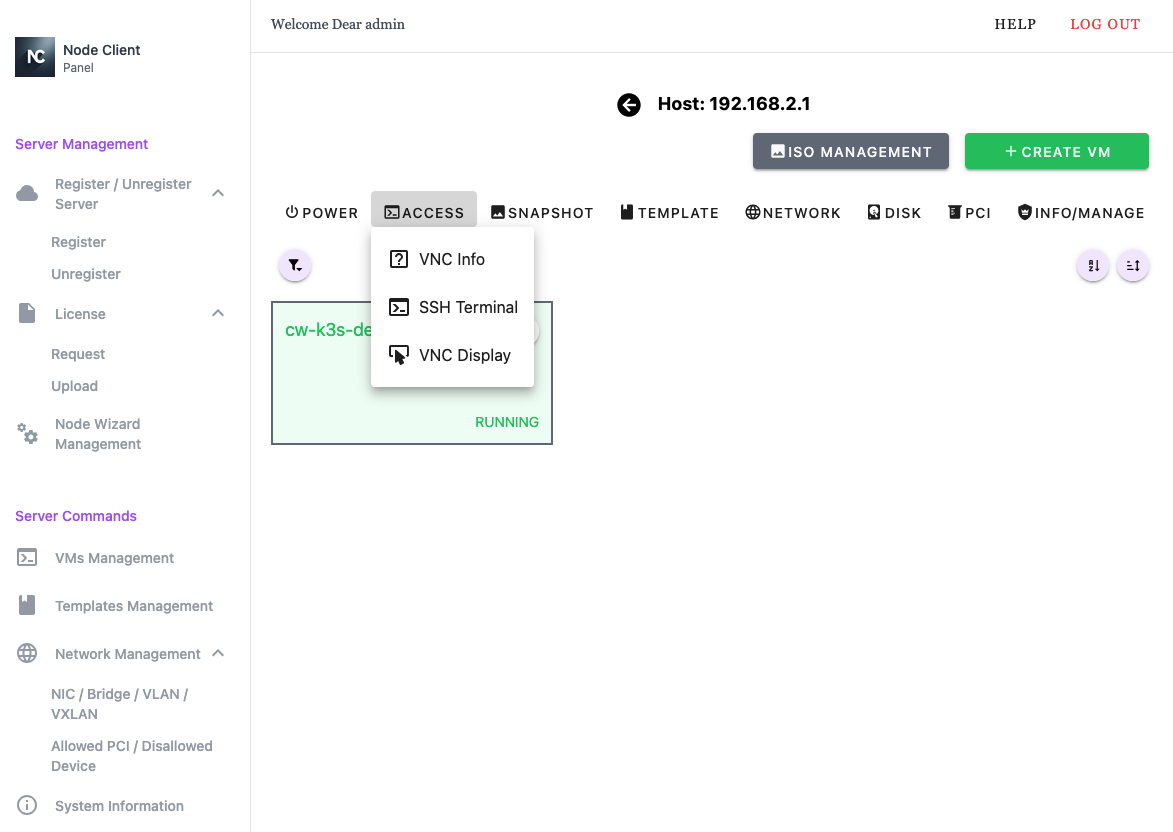
- VNC Info - Provide VNC connection information
- SSH Terminal - Provide WebUI based SSH access to selected VM
- VNC Display - Provide WebUI based VNC access to selected VM
3.1.3 Snapshot Menu
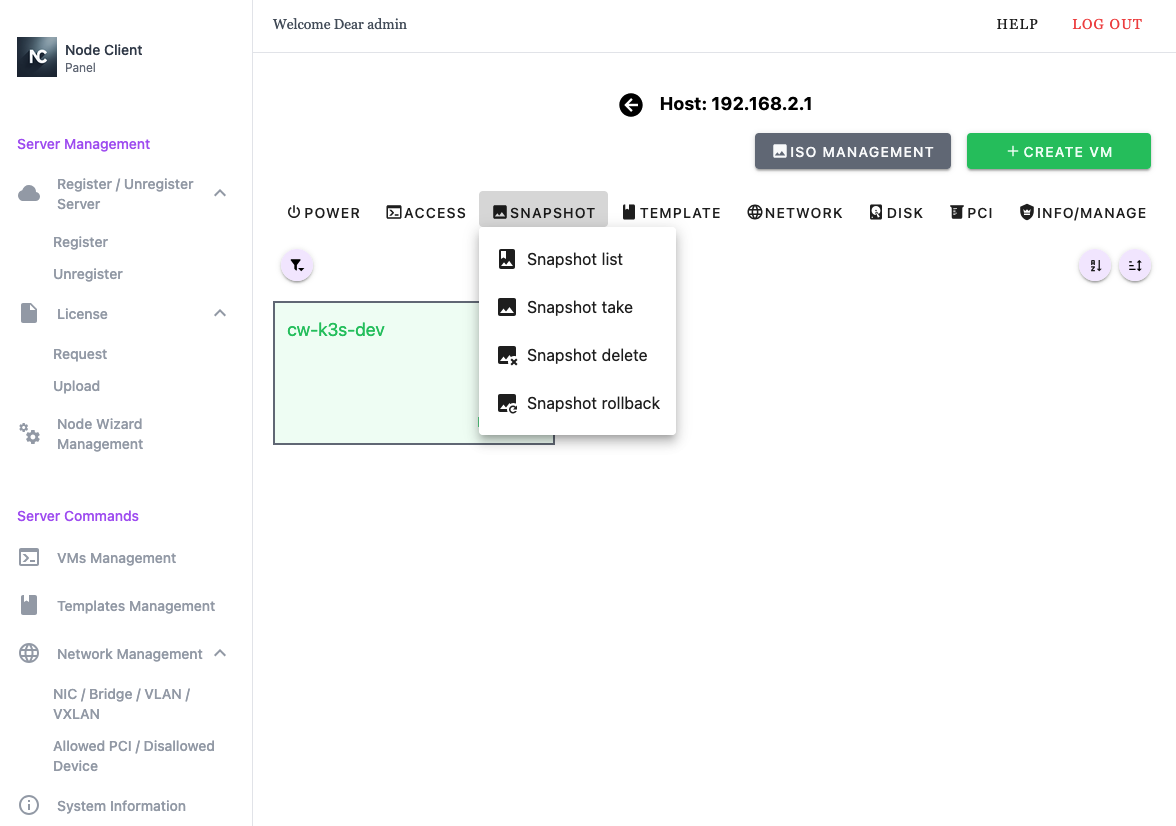
- Snapshot List - List all snapshots
- Snapshot take - Creates a snapshot of the selected VM
- Delete Snapshot - Delete a snapshot
- Rollback Snapshot - Restore the VM to a previous state
3.1.4 Template Menu
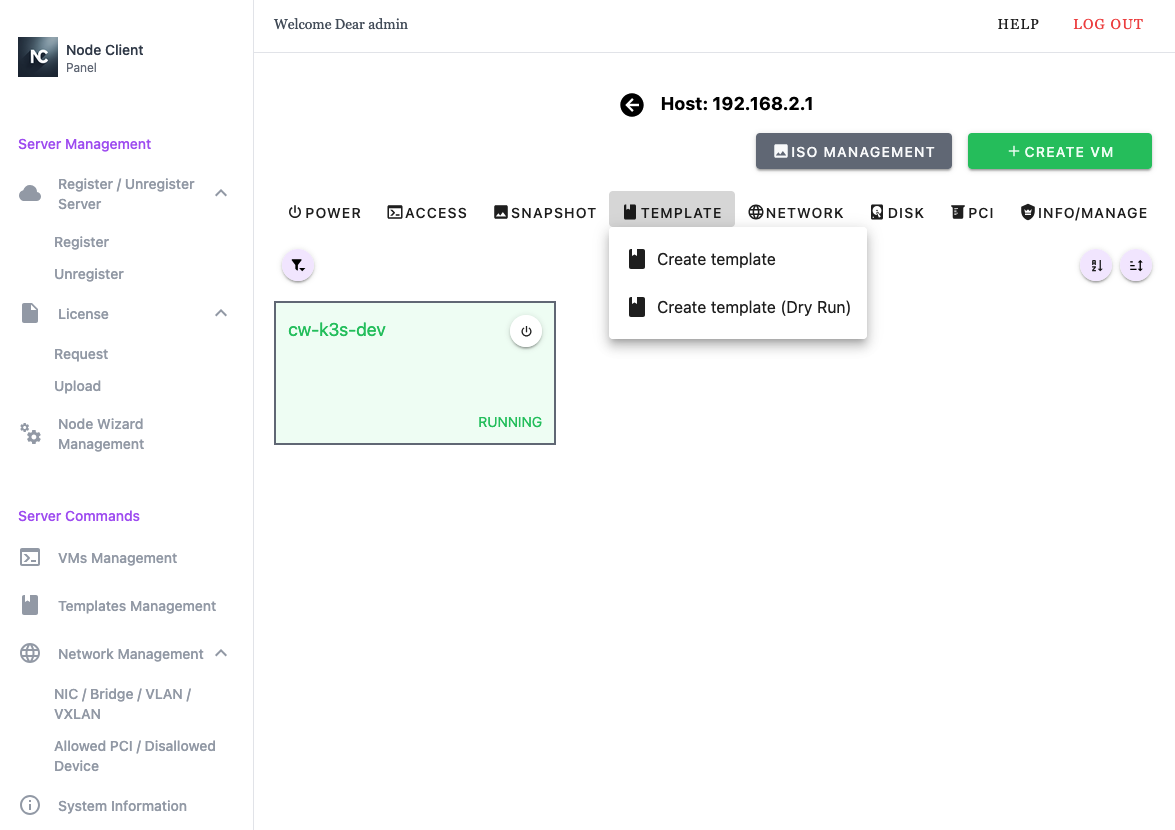
- Create Template
- Create Template (Dry Run)
3.1.5 Network Menu
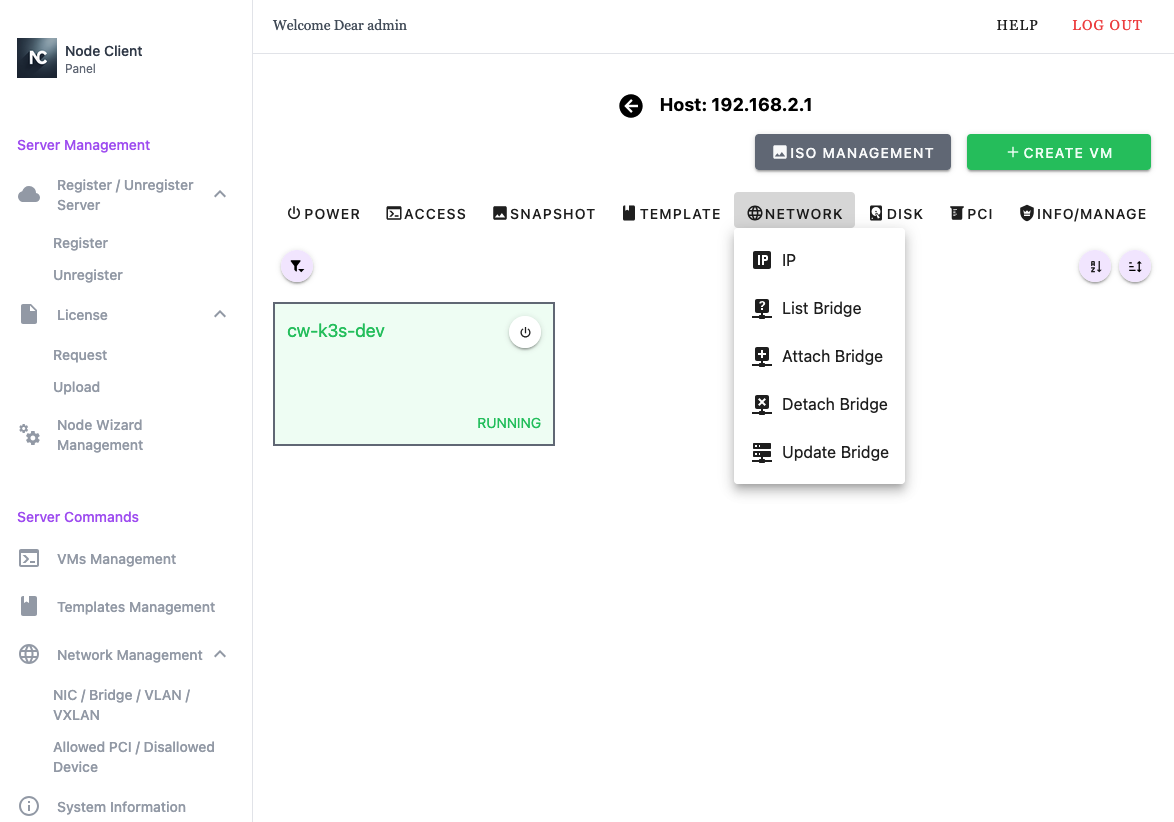
- IP - Display configured IP information for the VM
- List Bridge - List bridge network devices attached to the VM
- Attach Bridge - Attach a bridge network device to the VM
- Detach Bridge - Detach a bridge network device from the VM
- Update Bridge - Update bridge configuration
3.1.6 Disk Menu
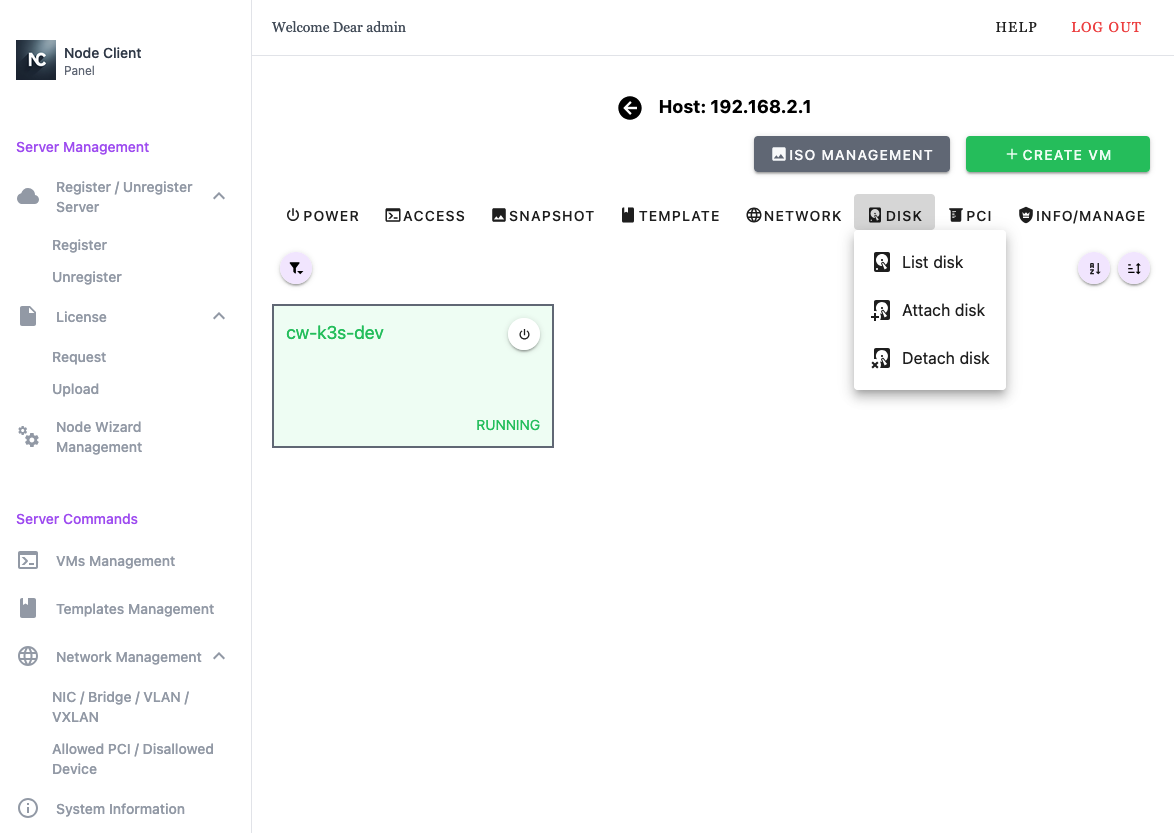
- List Disk - List all disks attached to the VM
- Attach Disk - Attach a disk to the VM
- Detach Disk - Detach a disk from the VM
3.1.7 PCI Menu
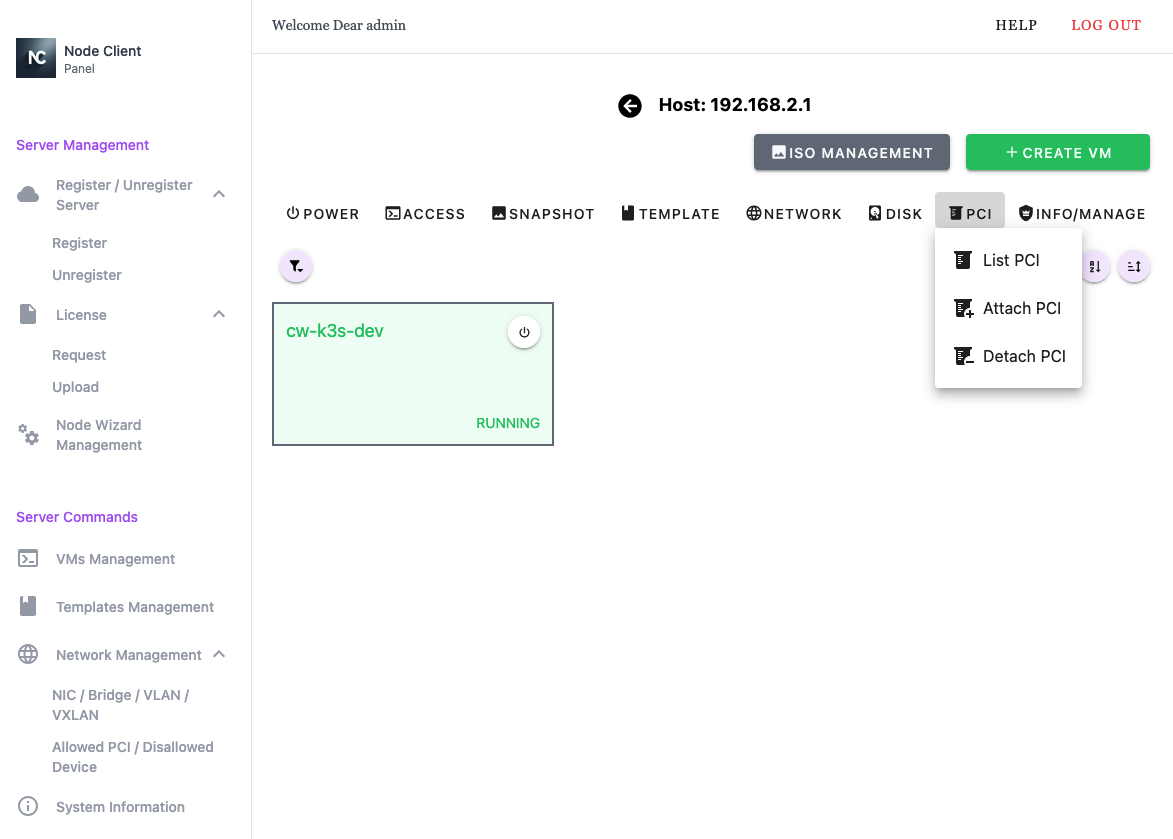
- List PCI - List all host PCI devices attached to the VM
- Attach PCI - Attach a host PCI device to the VM
- Detach PCI - Detach a host PCI device from the VM
3.1.8 Info/Manage Menu
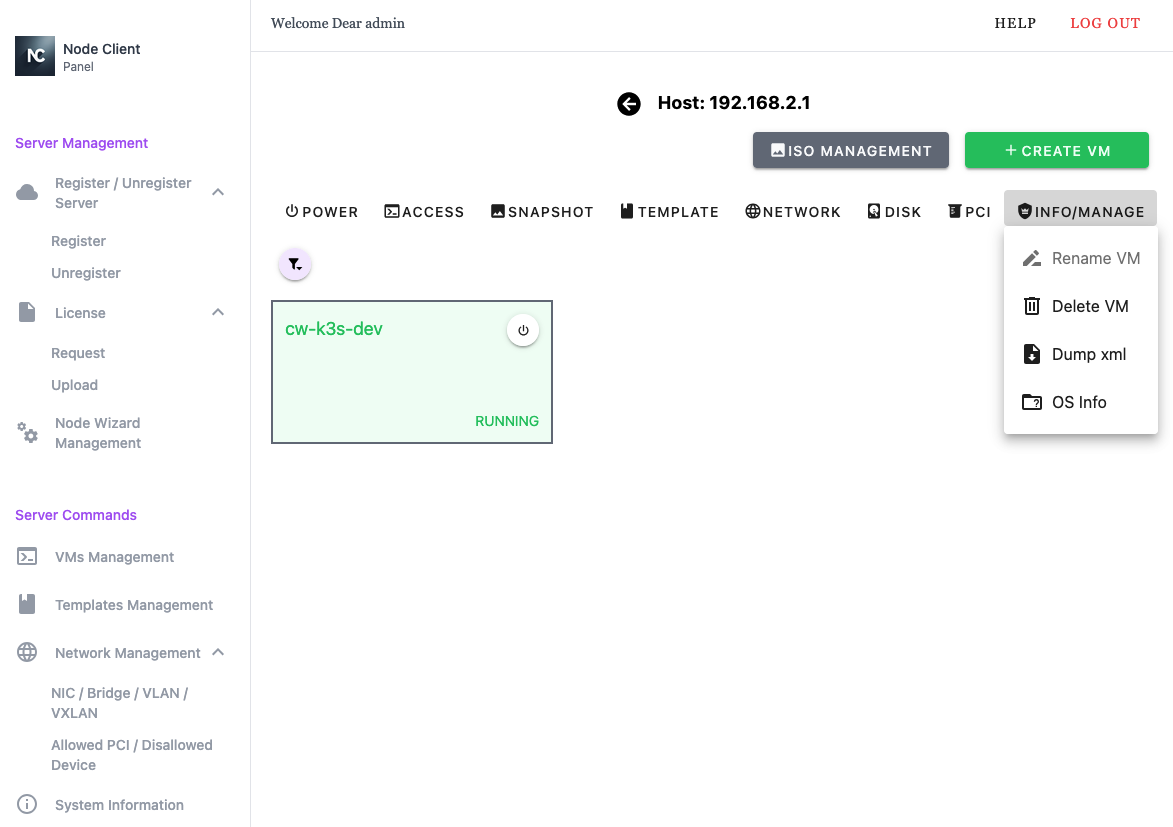
- Rename VM - Rename the VM
- Delete VM - Delete the VM
- Dump XML - Download the VM's current domain XML
- OS Info - Display known VM OS information
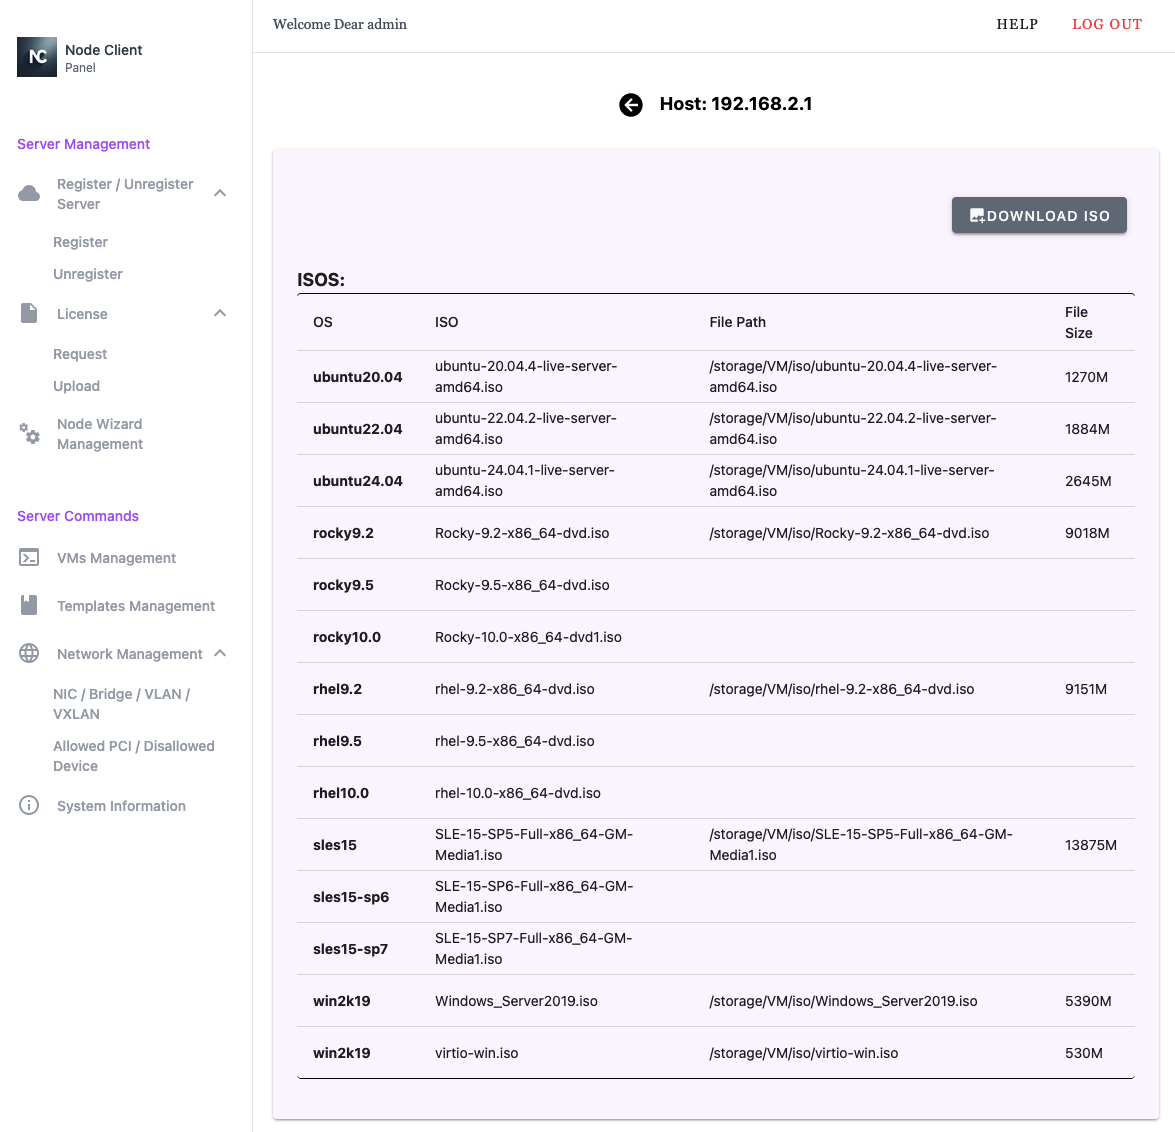
3.1.9 ISO Management
3.2 Template Management
The Template Management section provides tools for creating and managing VM templates, as well as deploying VMs from templates.
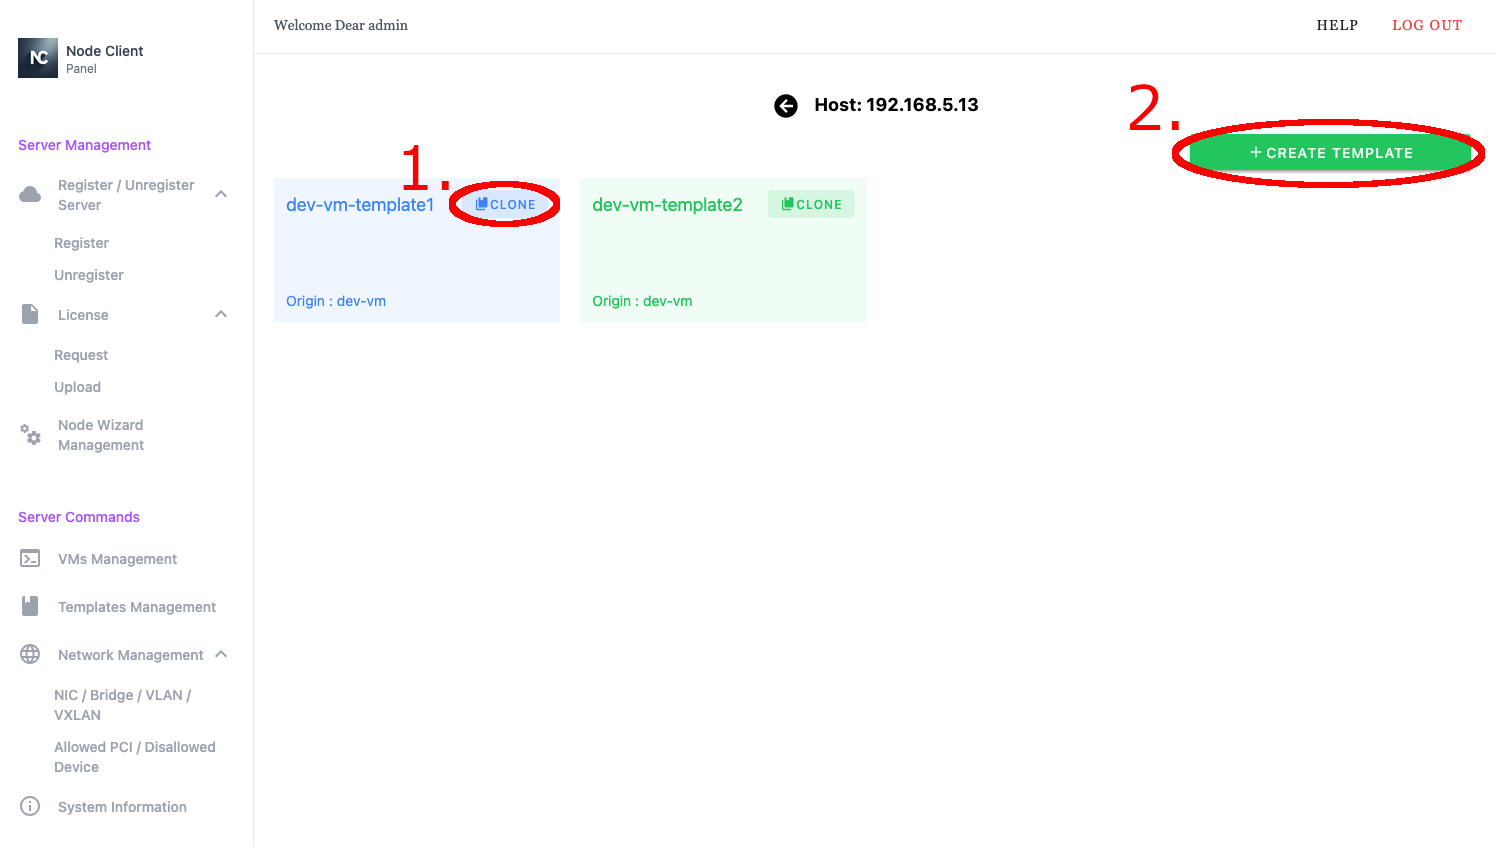
- Clone Template to VM
- Create Template from VM
- Clone Template to VM
- Create Template from VM
3.3 Network Management
The Network Management section allows the user to view and manage network interfaces, including device configuration and PCI device accessibility on the selected host.
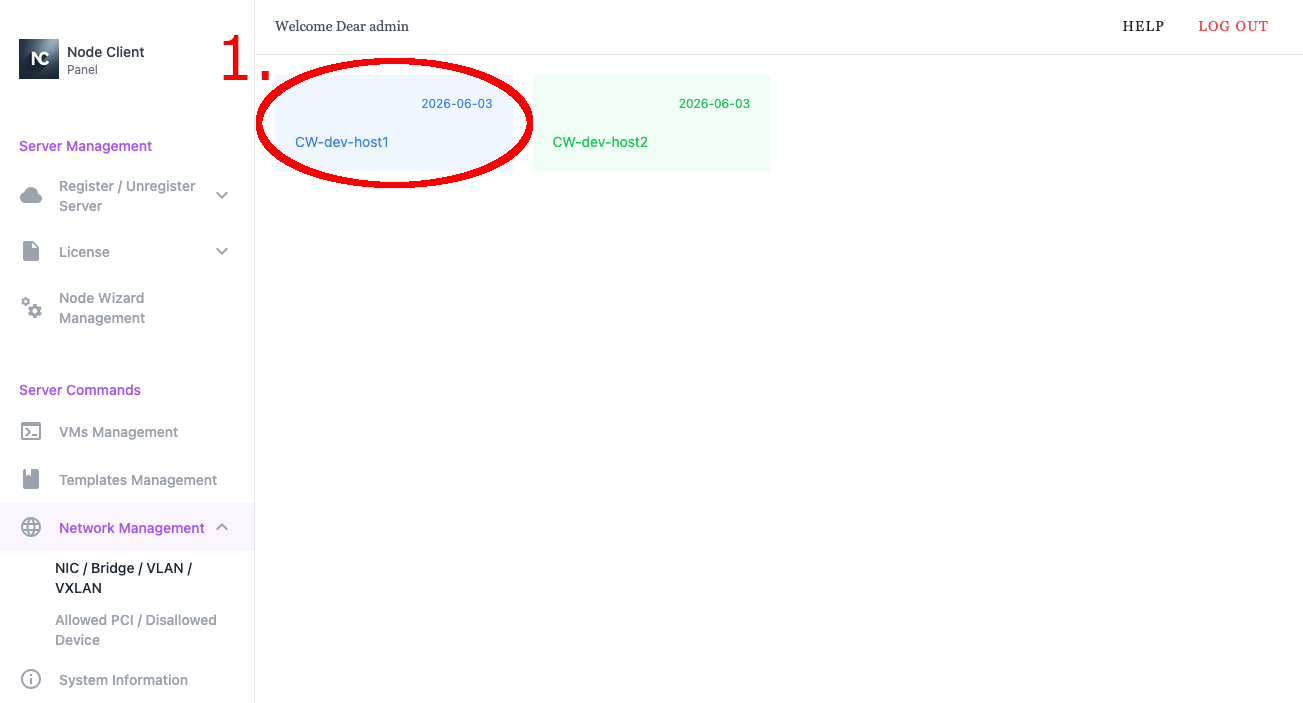
- Select host to manage its network
- Select host to manage its network
3.3.1 Network Management - Device Management
The Device Management view displays the network interfaces on the selected host, provides detailed configuration information, and allows the user to create new network devices such as bridges, VLANs, and VXLANs.
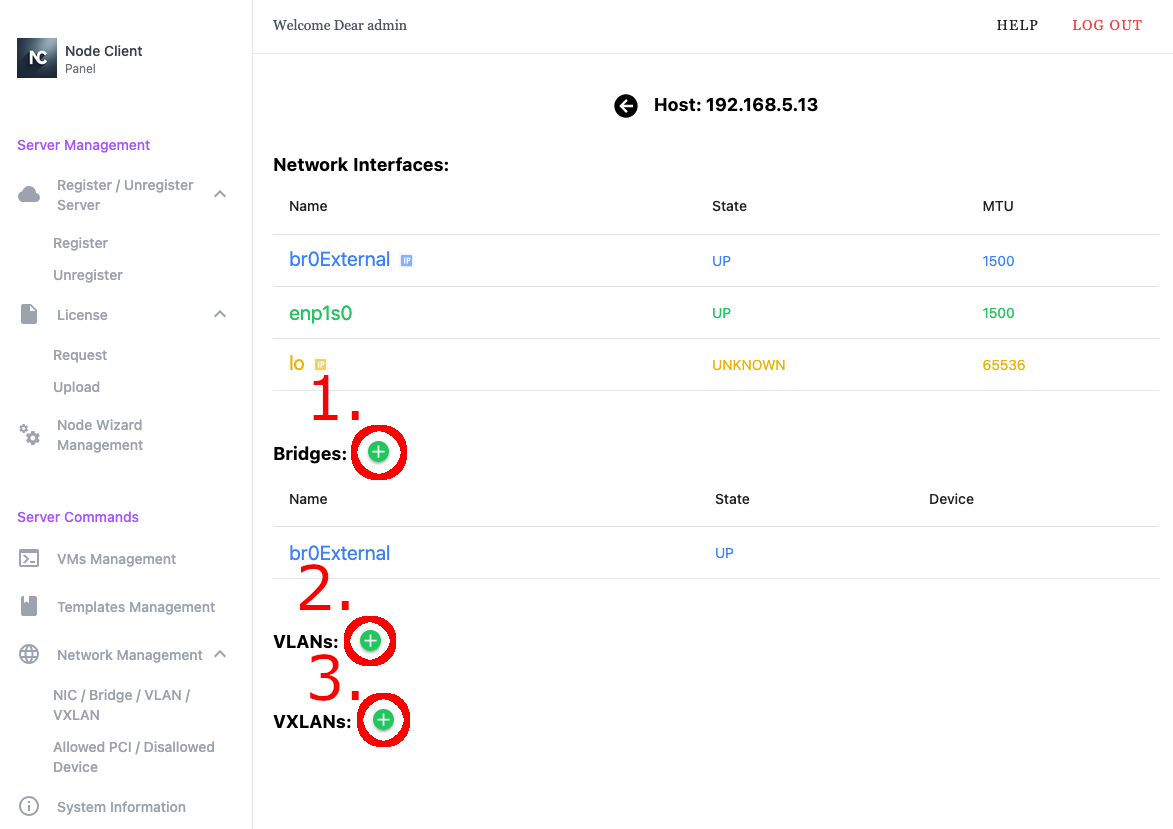
- Create Bridge - Add a new bridge interface
- Create VLAN - Add a VLAN interface
- Create VXLAN - Add a VXLAN interface
- Create Bridge - Add a new bridge interface
- Create VLAN - Add a VLAN interface
- Create VXLAN - Add a VXLAN interface
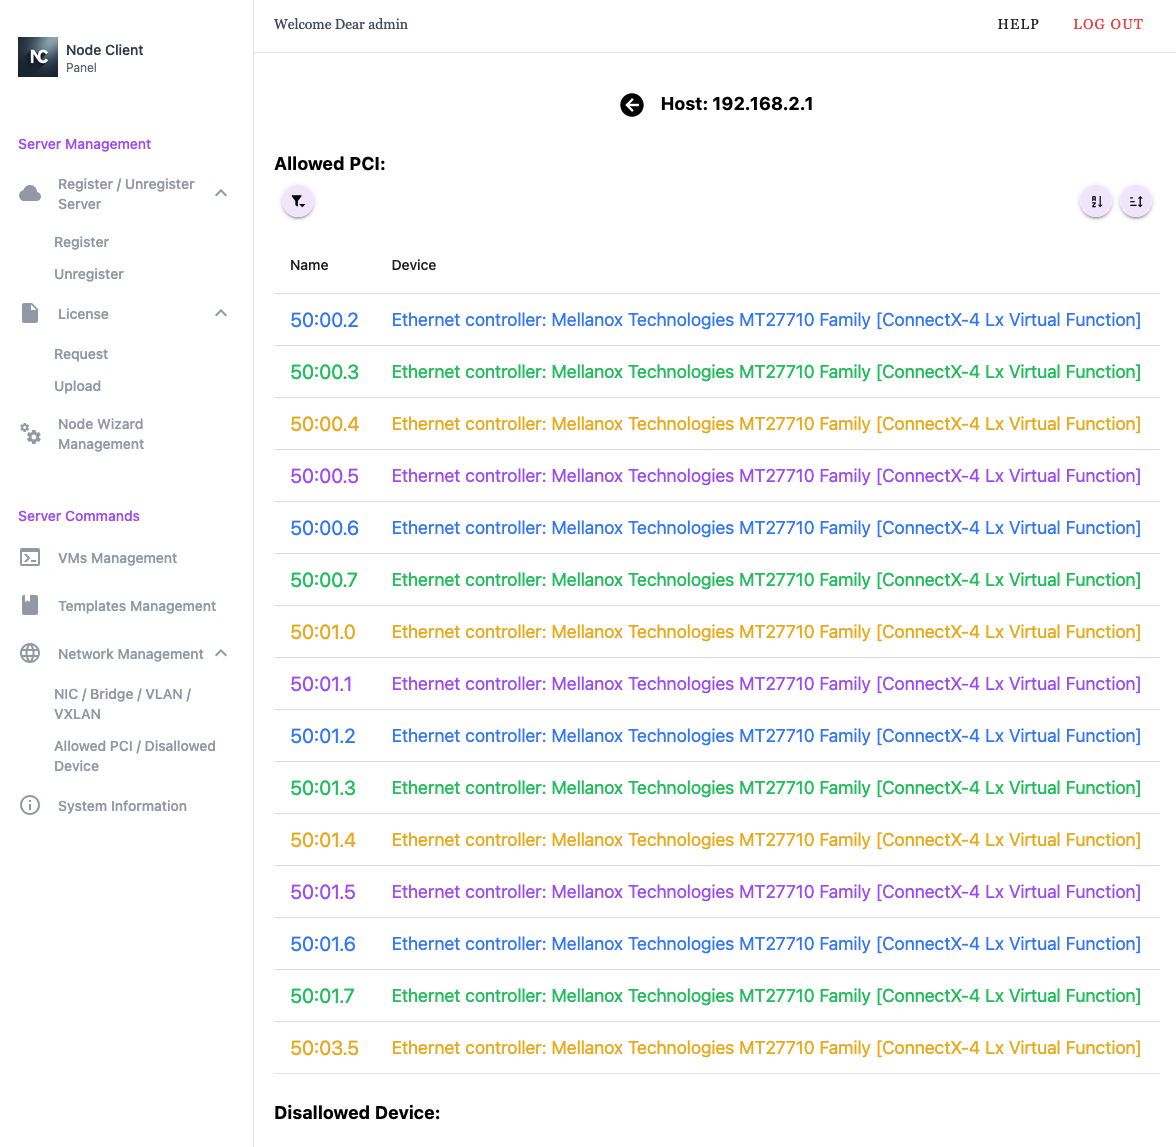
3.3.2 Network Management - Allowed PCI / Disallowed Device
The Allowed PCI / Disallowed Device view shows which PCI and network devices on the selected host are permitted or restricted for PCI pass-through operations and bridge attachment.
3.4 System Information
The System Information section provides access to host-level details and tools, including SSH access and system logs.
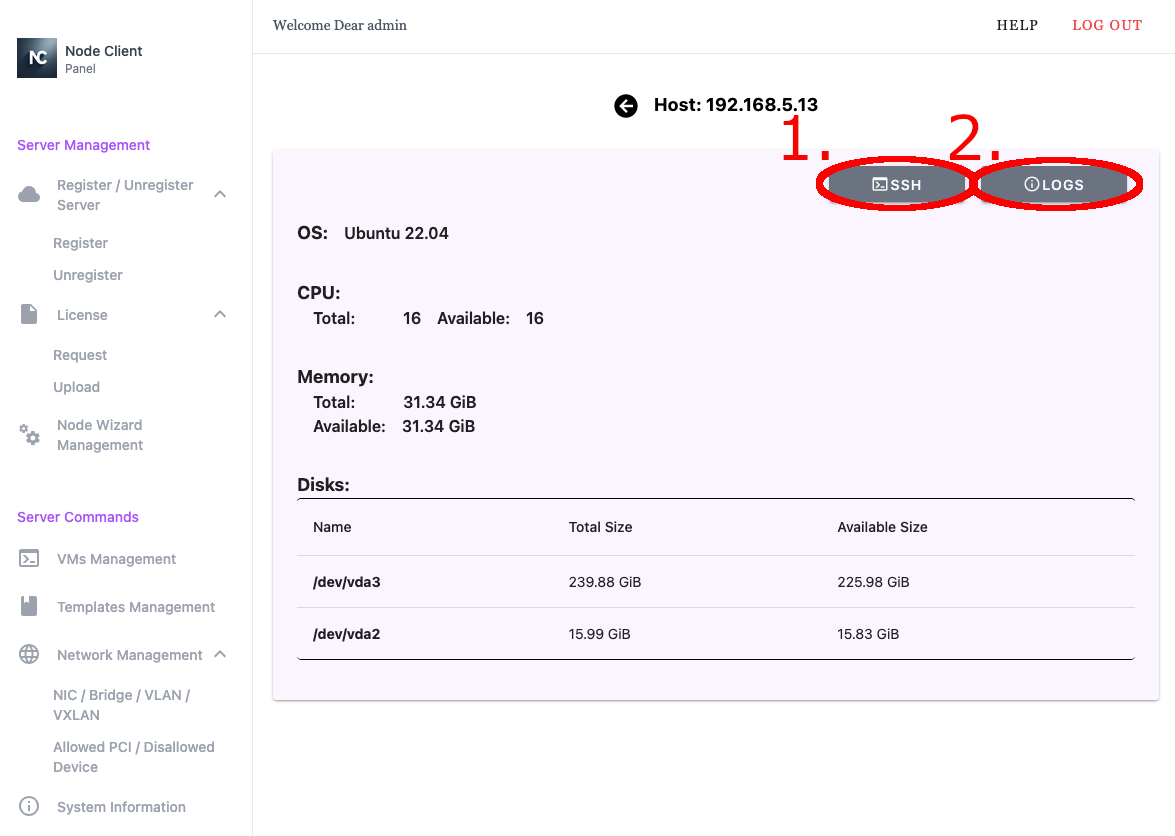
- Access host via SSH
- Logs
- Access host via SSH
- Logs